Tuesday, February 10, 2015

Automatically Activate Windows 7 and Microsoft Office From a Clean Install

The Windows activation process is usually quite simple… with the first Windows activation. Simply enter your product activation key, let Windows register the key, and you’re set to go. However, if you reinstall Windows several times… subsequent Windows activations can be a pain in the ***. In today’s post, we will review how you can automatically activate Windows 7 after a reinstall.

Windows Activation
This post may be helpful for those who reinstall Windows often. For example, I probably reinstall Windows 7 a bit more than the everyday computer user because I download, install and test a ton of apps so that I can write about them. With all of these apps and different programs on my PC, it’s sometimes nice to start fresh with a clean install of Windows every now and then.
Whenever you perform a clean install of Windows on a computer, it of course prompts you to reactivate Windows. So, you use your existing product key to reactivate the fresh install. However, this often trips up Microsoft’s overly sensitive activation safeguards, which can make reactivating Windows time consuming. In many cases, Microsoft will prevent you from activating Windows, prompting you with error messages like:
This copy of Windows cannot be activated. Please call Microsoft to use the phone activation.
or simply
This copy of Windows 7 cannot be activated on this machine.
If a Windows product key is used X# of times within a certain time period, then you usually get the above error messages. From there, it usually requires a call to Microsoft to help get Windows activated. Phone support with Microsoft, like many other companies, is absolutely not fun, and very time consuming.
With Advanced Tokens Manager, however, you can save your Windows activation settings prior to a fresh install, and restore the activation on the new copy of Windows.
To get started jump to the download page on Softpedia and download the latest version of Tokens Manager.
Windows Advanced Tokens Manager
Upon successful download, double click the Advanced Tokens Manager to launch the app. Also notice that this is a self deploying software and it does not require direct installation to a PC. This is how it is able to recover Windows activations keys.
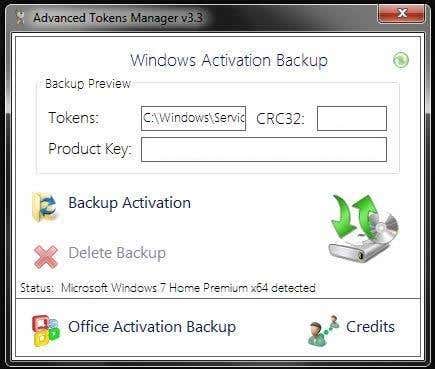
Advanced Token Manager Running
The app will display your computer’s product key and CRC 32. From here, simply click the Backup Activation button. Upon doing so, a few things will happen. First, the button will be switched to a Restore Activation button. Also note, that the product key will be directly stored in the same folder as the app. Notice the Windows Activation Backup folder in the following screenshot:
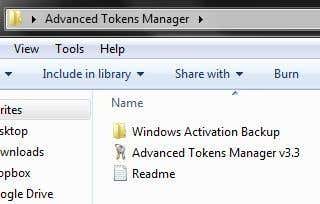
Activation Key Backup Complete
That’s pretty much all there is to it. Now, of course, be sure that you save the application and Windows Activation Backup app to an external hard drive, USB flash drive or other location so that you can copy it to your new Windows install.
With that done, you can proceed to clean install Windows 7 onto your machine. Once that process is complete, your fresh Windows install will not be activated.
Simply copy the Advanced Tokens Manager folder (including the backup and app) to your new copy of Windows and launch the app.
Above, it was noted that the app is self containing and doesn’t need to be installed. Thus, with it copied to the new Windows install, it can directly launch with the preserved settings.
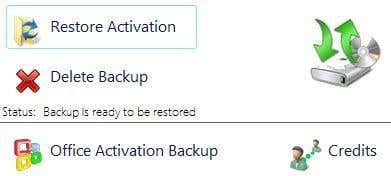
Restore Activation Token
Simply Click the Restore Activation button and Windows will re-active automatically. That’s basically all there is to it. No having to find your product key and manually enter it, then have Microsoft prompt you that Windows cannot be activated because the key has been used too many times, then having to call tech support and manually enter the product key by phone, all just to activate Windows.
Thank you for stopping by the site for today’s post, which provides an effective Windows activation method that will make the process simpler for not only tech professionals who reinstall Windows on client’s computers (to remove viruses and stuff), but for anybody who simply needs to reinstall Windows with minimum hassle. Also note, Microsoft Office uses product keys to activate the software also, so if you are reinstalling Microsoft office, this app also supports that.

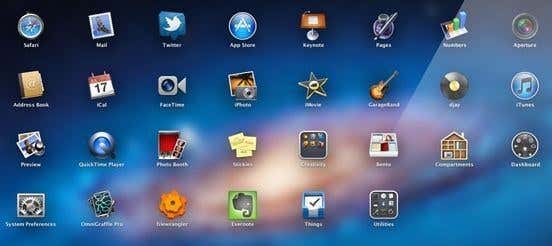
Add Launchpad Style Application Launcher to Windows 7

Opening programs and launching applications in Windows is usually done using the start menu or taskbar. However, if you have several apps installed, or would prefer a slightly different interface for deploying your favorite programs, you may want to consider using an application launcher.
This is a simple way to make Windows more fluid. Not sure what an application launcher is? It’s similar to the Launchpad feature in Mac OS X Lion, or the home screen on a smartphone; basically, a grid that is composed of several programs and apps.
Launchpad for Mac Lion
ViPad is a quality freeware application that adds a nicely designed application launcher to Windows 7. To get started, jump to this page at LeeSoft and download the latest version of ViPad.
ViPad
The program is fairly light, so it should download very quickly. Once the download finishes, double click the application to start using ViPad.
Windows ViPad Downloaded
From here, proceed to install ViPad as you would any other app. You will be presented with the basic installation wizard.
ViPad Setup
With the program successfully installed, you will simply be presented with a blank canvas, as you have not yet added any apps.
ViPad Running
To add an application (shortcut) to ViPad, simply locate the program on your PC and drag the app to the ViPad. You can locate specific applications using the path Start > All Programs. Here, we’ve added Spotify.
Alternatively, you can remove an application from ViPad by right-clicking it and selecting Remove from the context menu.
Spotify Added
You can also right-click on the New Tab listing to rename the tabs to whatever you’d like. Also, clicking the + button allows you to add more panels (screens) to the application launcher. Here, we’ve simply re-named New Tab to Music and created another tab titled Photography. Here are each of the tabs:
Music Tab
Photography Tab
Although the actual app usage is very simple, ViPad also offers some more advanced options, which are accessible by double clicking the circle located towards the bottom of the ViPad window.
ViPad Options
That’s basically all there is to it with ViPad. This app is not very complex, but it does offer a great foundation for launching apps and programs more quickly and fluidly within Windows 7. From our demo, you can also use the tabs feature on ViPad to add more structure and organization to your favorite applications. We sorted the programs into purpose, such as Music and Photography apps, but you could setup the tabbed structure for your specific preferences.

Customize the Windows Desktop and Taskbar

By default, the Windows UI is fairly appealing. Themes, Aero and other features provided by Windows allow you to customize and personalize your desktop according to your own preferences. However, you can add even further customization and some awesome features to your existing Windows install by using some desktop enhancement apps.
Aero Flip Win 7
There are a wide variety of different apps that can help you to customize and style the Windows desktop. We’ve previously recommended Rainmeter, which is tops as far as visual theming for Windows. However, the company Stardock also makes some quality Windows apps that are mostly based on customization and versatility.
To get started, jump to the Stardock homepage for consumers. There, you may notice that the company offers several Windows based apps, many of them being available as freeware downloads. Here are some programs that you can add to Windows for a better visual effect, but also more features.
StarDock Webpage
Tiles
Tiles is a basic program that can help you to better track the running/open applications in Windows. By adding a visually appealing Tiles pane to the Windows desktop, this app allows you to view previews of the opened apps, and even navigate custom paths directly from the Tiles pane.
Windows Tiles app
Blinds
Blinds is an advanced theming engine for Windows that allows you to customize nearly ever aspect of the Windows desktop. This program is not available as freeware, but it is available as a trial. With Blinds, you can go beyond what the default Windows skins and themes offer, and completely overhaul your desktop.
Windows Blinds
Fences
By default, Windows desktop icons are arranged rather plainly. Windows does allow you to sort and rearrange desktop shortcuts and programs, but this is about as far as it goes for out of the box Windows desktop customization. With the Fences app, available for free, you can actually build fences around desktop shortcuts and icons for better organization and desktop customization. The final design result will be more of a HUD look.
Fences
Object Dock
Object Dock brings a Mac OS X like dock to Windows. If the basic Windows taskbar is not for you, you can simply hide it from the desktop and instead use Object Dock to launch your favorite programs and apps. Aside from basic visual animation, this app also adds more features that help you to navigate around Windows more effectively.
Object Dock
Those are just a few of the great programs that the Stardock Windows customization company offers. Some other apps that you might be interested in are:
  • BootSkin – Change Windows boot screens the easy way
  • Cursor FX – Completely custom Windows cursors and pointers app
  • Tweak 7 – Optimize Windows Performance using an app.
For a full list of programs that are available for free from Startdock, you can check out their products page.
Stardock Apps
Overall, all of these apps can add more functionality and customization to the Windows desktop. This article is not affiliated, but simply a review of some of Stardock’s best products. Because all of the apps listed in this article are from the same company, you can use a combination of Windows desktop and taskbar apps for extreme Windows theming and customization.

10 Essential Skills for Windows Users

I was doing a bit of SEO research the other day, in an attempt to find better topics to write about here at Online-Tech-Tips. I may have found a few gems, which I will hopefully post about sometime soon.
In the research, I found that many of the most searched for Windows terms revolve around some very basic Windows usage concepts. This is quite understandable, as Windows itself doesn’t come with any kind of user manual, except for the Getting Started digital software guides that Microsoft offers with some of their products. For today’s post, we will cover 10 essential skills that every Windows user should know, based on SEO demand.
Windows High Tech
1. Run as Administrator
In some cases, you may need to run a program as administrator in order to access it. By opening the app as an administrator, you are simply accessing the program using higher privileges, which some apps require.
To run as administrator, simply right-click the program or app and select Run as administrator from the right-click menu. This will launch the program in administrator mode.
Run as Admin
2. Open an Elevated Command Prompt
Following the Run as Administrator step (1.), there may also be some cases where you need to use Windows to open an elevated command prompt. Using what you learned about Run as Administrator, you can also use to open the prompt.
To open an elevated command prompt, launch the start menu and type the term command prompt into the search box. From there, right-click the command prompt listing from the search results and Run it as administrator.
Elevated Command Prompt
3. How to Print Screen (Screen Capture)
To take a screen capture in Windows, you can simply press the PRINT SCREEN/PRTSC/PRTSCN button on your computer’s keyboard. This will take a full view screenshot of whatever is active and open on the PC.
Alternatively, you can press the ALT + PRINT SCREEN buttons on your keyboard to take a screenshot of only the active window.
From here, you can simply paste the copied image into an application.
PRNT SCREEN
4. Change Your Windows Account Password
If you would like to change your Windows account password, the simplest way to do it is to use the Start menu search function. Simply click the Start button and type the term change password into the Search programs and files box.
Select Change your Windows Password from the search results.
Alternative method: Simultaneously, press the CTRL + ALT + DELETE keys on your computer’s keyboard. Select the Change a password option.
Windows 7 Change a Password
5. Install Fonts
Installing fonts in Windows is quite simple. Once you’ve downloaded a font that you would like to install, simply right-click on the font file and select Install from the context menu.
Also note, if you want to install multiple fonts, you can select them all, right-click and use the above method.
Install a Font in Windows
6. Show Hidden Files
By default, Windows doesn’t display every file that is on the system. In some cases, you may need to show hidden files in order to access key files for the Windows operating system.
To show hidden files, navigate the path Start > Control Panel > Appearance and Personalization > Show Hidden Files and Folders. Click the OK button.
Windows Hidden Files
7. How to Set and Adjust Windows startup programs.
By default, many programs or apps that are installed in Windows auto set themselves to launch every time you start your computer. If too many programs are set to run with Windows automatically, it can slow your computer down significantly.
To set Windows startup programs, launch the Start menu and search for the term msconfig. Selectmsconfig from the search results to launch System Configuration.
On the first tab, General, select the Selective startup option. Next, click the Startup tab, where you can toggle on or off startup programs.
System Config
8. Restart Windows in Safe Mode
Windows Safe Mode has various purposes, but it is commonly used as a less resourced boot of Windows that only loads essential Windows services. Safe Mode is commonly used to diagnose viruses and malware.
To restart in Safe Mode, click the Start Menu and restart your PC. When your PC shuts off and then begins to boot back up, press the F8 key on your keyboard. This will open the Advanced Boot Optionsmenu, where you can boot into Safe Mode.
Windows Advanced Boot Options
9. How to use Windows System Restore
The Windows System Restore option allows you to revert the base operating system back to an earlier time, while leaving photos, documents and other files intact.
To launch Windows System Restore, open the path Start > All Programs > Accessories > System Tools > System Restore. Alternatively, you can simply use the Windows search function with the termsystem restore to jump directly to the utility.
System Restore Window
10. Boot from CD or Disc
Booting Windows from a CD or Disc is a slightly different process, depending on what particular PC you have. To get started, insert the CD/Disc into the optical drive and restart your computer.
When the PC starts back up, you will see a BIOS screen that prompts you to press a key to access the BIOS. Press the specific key that is listed to enter the BIOS.
Locate the boot options in the BIOS and select the option Boot from CD/Boot from Disc/Boot from Drive/ Boot from (Drive Letter), or similar.
From here, Windows will boot from the disc rather than the OS.
Windows BIOS
That’s basically all there is to it. With the above, essential skills for Windows users mastered, you should have no problem with the majority of Windows tasks.

Fix Delay When Typing in Windows

I recently ran into a very annoying problem while using Microsoft Word on my Windows 7 machine. Firstly, it’s a fairly fast machine and so I kind of knew it was not a hardware issue when I saw there was a delay between typing characters on the keyboard and them showing up on the screen. Sometimes there was no delay, but randomly the delay would jump to a second or even several seconds!
I was pretty sure it wasn’t related to the processing power of the machine because it’s a Core i5 laptop running Windows 7! After doing a lot of research, I finally managed to figure out what the issue was and now I don’t have any more lag between typing and characters showing up on the screen. However, depending on your system, you may or may not be able to fix the problem.
In this article, I’ll try to go through all the different reasons why you could be having this problem and how to solve it, if possible.

Hardware – Graphics Card

Even if you have a fast processor, the delay between your keyboard and screen could be caused by having an integrated graphics card. Integrated graphics cards are much cheaper than a dedicated graphics card and can be the bottleneck in the whole transfer of your typing into words on the screen. This is especially true if you type really fast, i.e. 40+ words a minute. If you didn’t have this problem before and now you’re having it all of a sudden, then it’s probably not the graphics card, so keep reading.

Hardware – Memory Module

Even though this is rare, if you have a faulty memory module or a memory module that is not properly seated, then one of the manifestations of that could be delayed typing. If you know how to check your memory, it’s a good idea to take the chips out and put them back in one by one and see if makes any difference.
You can also run a memory diagnostic on your compute using a free program called Memtest86. You can download it here:

Software – Lack of Resources

The other main culprit is simply lack of system resources. It doesn’t matter how much memory or how fast your processor is, if all the RAM is being used and the CPU is running at 100% utilization, then you’ll see lag not only if typing, but in doing normal computer activities. On a Windows machine, go ahead and open task manager by pressing CTRL + SHIFT + ESC.
task manager
Go ahead and click on the Performance tab and you’ll see a few graphs for CPU Usage and Memory. Make sure are not completely green, meaning being completely utilized. If you see your CPU usage is anything over 50% consistently, then you have to determine which program(s) are causing the spike and either remove them or disable them.
This can also be caused on systems that have a lot of malware installed or have a virus. If you suspect any type of computer infection, try to remove that first.
Lastly, make sure you disable any CPU-intensive programs like anti-virus software. A lot of times anti-virus software can go crazy and start scanning everything under the sun and it can really slow the system down. If you have anti-virus running, try disabling it and see if the delay in typing goes away.

Software – Clean Boot

If you have determined that it’s something to do with Windows, then the next step is to perform a clean boot. A clean boot basically disables all startup items and all non-Microsoft services and then starts up the computer. You can read step by step instructions on how to perform a clean boot here:
If you find that there is no typing delay after a clean boot, then you know either a service or a startup program is causing the problem. You’ll have to follow the directions on how to enable items one by one to figure out what specific process or service is slowing down the system. It’s a little time intensive, but it’s better than having to reinstall Windows.
If you have a computer from HP or Dell, it’s probably full of bloat-ware. It may be a good idea to simply perform a clean install of Windows if you have the time, patience and knowledge. You can go through and uninstall all that extra stuff too, but it usually ends up staying in your registry.

Both WiFi and LAN Enabled

It has also been confirmed that this issue can occur if you have both WiFi and LAN enabled on your Windows PC. Go ahead and disable one network connection, then restart and see if the issue occurs.

Other Issues

– Make sure you are not running out of hard disk space. If you are low on hard disk space, go ahead and use a program like CCleaner to delete temp files, etc. Uninstall some programs to free up space.
– Update all drivers on your computer. A few people have said updating their graphics card and other hardware drivers fixed the problem. If you are using a special keyboard of some sort, make sure you download the latest driver for that.
– If you’re using a wireless keyboard, try a keyboard that plugs in directly to the computer and see if the issue goes away. It could be a problem with the wireless keyboard.
– If you’re using a laptop and getting the delay, try taking out the battery and see if the delay in typing goes away. Oddly, some people said taking the battery out fixed the issue.