Need to get into Safe Mode on your Windows PC? If you’re not able to boot your computer normally, you can try to enter safe mode, a diagnostic mode for Windows that lets you troubleshoot problems that prevent normal booting.
In Safe Mode, Windows only loads the most essential services and drivers in order for it to run. All other normal Windows settings and start up programs are disabled in order to allow the user to fix the problem with their computer.
In this guide, I am going to go through the steps to get into Safe Mode in Windows XP, Vista, 7, 8.1 and Windows 10.
Note that if you installed a driver or just recently made a configuration change to your computer, you may want to try the “Last Known Good Configuration” before going into safe mode in Windows 7, Vista and XP.
Last Known Good Configuration loads the last working version of Windows. However, it is replaced each time you log into the computer, so if a problem has occurred, make sure to try this option BEFORE logging onto the computer again.
In Windows 8 and Windows 10, the Last Known option is no longer included. Instead, they have other options like Refresh, Reset (Reinstall), Restore, etc. I’ll go into more details below in the Windows 8/10 section.
Also note that there are three types of Safe Mode, so read the descriptions below to figure out which one is best for you.
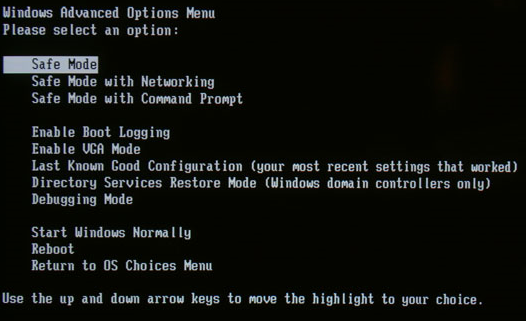
Safe Mode – The basic option that loads Windows with a GUI interface and is usually what most people should choose when troubleshooting their computer.
Safe Mode with Networking – If you need access to the Internet or the network while in Safe mode, then this is the option to choose. This mode is useful when you need to fix a problem that requires an Internet connection so that you can download updates, drivers, or other files to help fix your problem.
Safe Mode with Command Prompt – This mode will load with just the MS DOS command line prompt. This is useful if you need to run a DOS command like fixboot or chkdsk.
Safe Mode in Windows XP/Vista/7
To get into the Safe Mode in Windows XP, Vista or 7, re-boot the computer and then press and hold the “F8 Key” which will then bring up the “Windows Advanced Options Menu“. Scroll down to “Safe Mode” using the arrow keys and press Enter.
Note that sometimes if you press and hold the F8 key, some computers will start to beep annoyingly, so in that case, simply hold the F8 key continuously during the boot up period.
If you are still not able to get into Safe Mode, you can try to kill the power on the computer to turn it off and then turn it back on. If Windows shuts down unexpectedly, it will usually bring up the Advanced Boot Options menu automatically. If that doesn’t work, you can read my previous post on getting into Safe Mode if F8 is not working. This method, however, requires you to be able to log into Windows in order to tell it to boot into safe mode on the next restart.
Safe Mode in Windows 8/10
In Windows 8 and Windows 10, the process of getting into safe mode is completely different. The F8 key no longer works because the boot process is too fast.
The only way to get into safe mode is to boot into System Recovery Options, which is where you can perform various troubleshooting tasks including starting in safe mode.
I’ve already written about how to boot to the Windows 8 System Recovery Options screen, but the process is slightly different for Windows 10, so I’ll mention it here. In Windows 10, there are two ways to get to the recovery options screen. Firstly, you can click on the new Start button, which is back again in a different form, and then hold down the SHIFT key and click on the power button.
While still holding down the SHIFT key, click on Restart. The other way is the same as Windows 8, but it just looks a bit different. Click on the Start button and then click on Settings as shown above.
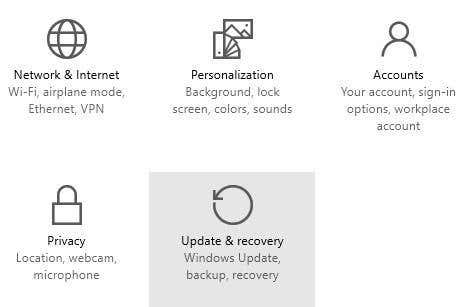
This will bring up a new Settings dialog that basically replaces the PC Settings dialog in Windows 8. Here you will click on Update & recovery.
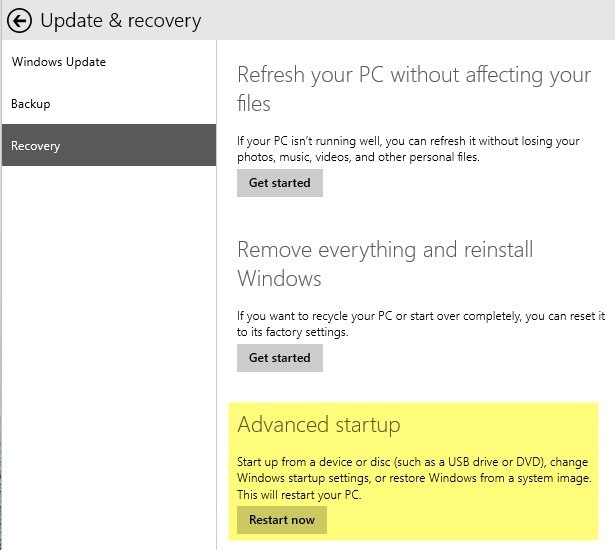
Now you’ll see the options to refresh your PC, reinstall everything or restart in advanced startup mode.
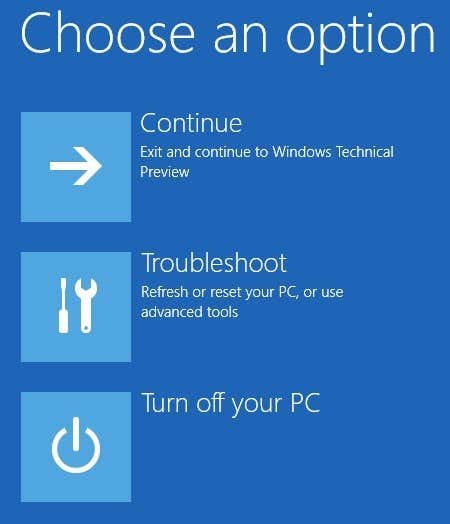
 At this point, the process to get into Safe Mode in Windows 8 or Windows 10 is the same. You’ll now see three options: Continue, Troubleshoot and Turn off your PC.
Now just follow the instructions on my article on booting to safe mode in Windows 8. You basically click on Troubleshoot and go from there. Windows 8 and Windows 10 are also a lot smarter than previous versions and will normally bring up the recovery options automatically if a problem is detected while booting.
If you have any questions about getting into safe mode on any version of Windows, feel free to post a comment. Enjoy!
In Windows 8 and Windows 10, the process of getting into safe mode is completely different. The F8 key no longer works because the boot process is too fast.
The only way to get into safe mode is to boot into System Recovery Options, which is where you can perform various troubleshooting tasks including starting in safe mode.
I’ve already written about how to boot to the Windows 8 System Recovery Options screen, but the process is slightly different for Windows 10, so I’ll mention it here. In Windows 10, there are two ways to get to the recovery options screen. Firstly, you can click on the new Start button, which is back again in a different form, and then hold down the SHIFT key and click on the power button.
While still holding down the SHIFT key, click on Restart. The other way is the same as Windows 8, but it just looks a bit different. Click on the Start button and then click on Settings as shown above.
This will bring up a new Settings dialog that basically replaces the PC Settings dialog in Windows 8. Here you will click on Update & recovery.
Now you’ll see the options to refresh your PC, reinstall everything or restart in advanced startup mode.

At this point, the process to get into Safe Mode in Windows 8 or Windows 10 is the same. You’ll now see three options: Continue, Troubleshoot and Turn off your PC.
Now just follow the instructions on my article on booting to safe mode in Windows 8. You basically click on Troubleshoot and go from there. Windows 8 and Windows 10 are also a lot smarter than previous versions and will normally bring up the recovery options automatically if a problem is detected while booting.
If you have any questions about getting into safe mode on any version of Windows, feel free to post a comment. Enjoy!


No comments:
Post a Comment