Tuesday, February 10, 2015

Setup Different Backgrounds for Dual Monitors in Windows 7

If you’re still using Windows 7 because you hate Windows 8 and you use more than one monitor, you’ve probably run into the limitation of not being able to use a different wallpaper for each monitor. Windows 8 actually has quite a few awesome features for dual or more monitor setups, but until they fix the whole Start Screen/No-Start-Button issues, people aren’t going to be migrating anytime soon.
Luckily, there are a couple of things you can do to rectify this problem in Windows 7. I’ll walk you through the different methods, starting with a simple little trick in Windows 7 which won’t require you to install any third-party software. The rest of the options are freeware or commercial applications.

Method 1 – Create a Larger Image

If you have multiple monitors that are using the same resolution, then you can actually create an image that is the width of all the monitors combined and use that as your wallpaper. For example, if you are using two monitors with a resolution of 1600×1200, then you can create an image that is 3200×1200 and load that up as the background.
The only thing you have to do is to choose Tile and it will span the image across the screens. If you have three monitors, then you would create an image that is 4800×1200 and so on.
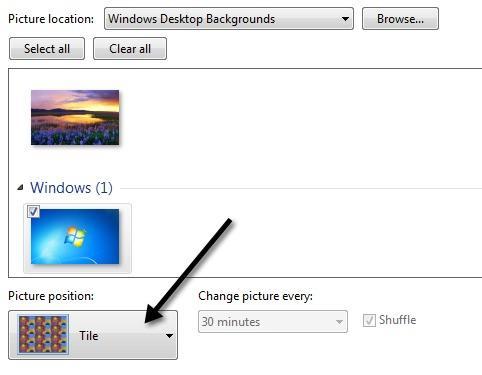
tile background image
Now if you have monitors with different resolutions because the monitors are different, then you can use a similar technique, but you’ll have to play around with the alignment to get it right. You’ll still stitch the images together, but you’ll have to leave some black or white space at the bottom of one to get them to align correctly.
A cool site that helps you find wallpapers for multiple screens is InterfaceLift.com. Or you can find wallpapers for the exact resolution that you need. It’s a very help site in this regard.

Method 2 – Dual Monitor Tools

A free and open source program called Dual Monitor Tools works really well for using different backgrounds in Windows 7.
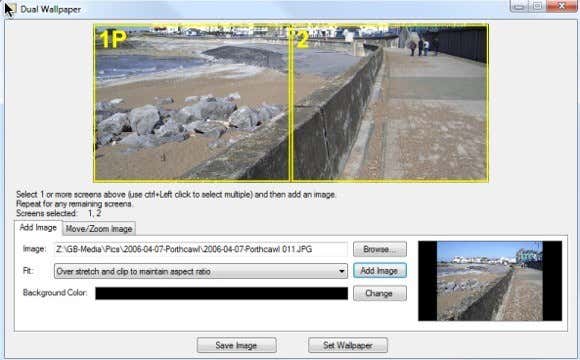
dual monitor tools
You can use it to spread one image across multiple monitors or you can use a different image for each monitor. The program lets you adjust the images and preview the changes before you actually set the wallpapers. It can also handle if one monitor is landscape and another is portrait.
The program also has a bunch of other features like swap screen for managing windows using hotkeys and dual launcher, which lets you open applications with hotkeys and have then open on specific monitors at specific positions.

Method 3 – DisplayFusion, UltraMon, MultiMon

There seem to be only a couple of players in the multi-monitor software camp and those are namely DisplayFusion, UltraMon and MultiMon. Both DisplayFusion and MultiMon come with free versions that can accomplish the goal of setting different wallpapers in Windows 7. If you want all the extra features that they include, you can buy the paid versions, but for our purposes it’s not necessary.
Luckily, I already wrote a review of these three programs: Best Dual Monitor Software. It’s really hard to say which one is better since they all do a REALLY GOOD JOB.
Of course, like I mentioned before, in Windows 8, you no longer have to worry about this problem. Now you can just right-click on the image and choose which monitor you want that background to apply to.
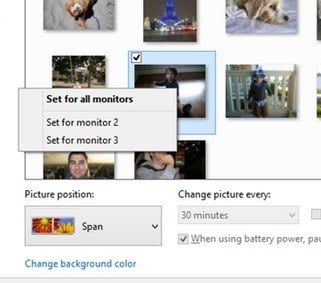
windows 8 multi monitor
If you know of another way or use a different program for setting different backgrounds in Windows 7, please let us know in the comments.

Export Contacts from Outlook, Outlook Express and Windows Live Mail

Need to export your contacts out of Outlook? I used to work at an office where there are multiple versions of Office installed on employee computers including Office 2003, Office 2007, Office 2010 and Office 2013! When someone switched computers, I usually end up having to export their email and their contacts to a different computer, which more often than not had a different version of Office installed.
If you create multiple contact folders in Outlook, then you have to export each one of those individually. In this article, I’ll show you how to export contacts in the different versions of Outlook. I’ll also mention the process for Windows Live Mail, if you happen to be using that program.

Export Contacts from Outlook 2003, 2007

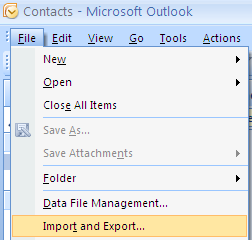
Let’s start with the older Office 2003! Note that the same procedure works for Outlook 2007. First open Outlook and then go to File and then Import and Export. If the menu option is greyed out, make sure to check out this Microsoft KB article. If the Import and Export option is missing altogether, then you have to simply add it to the File menu.
You can do this by clicking on View, then Toolbars and then Customize. On the Commands tab, click onFile under categories.  Scroll down the list until you find the Import/Export command towards the bottom of the list. Now just drag it onto the actual File menu and drop it.
export contacts
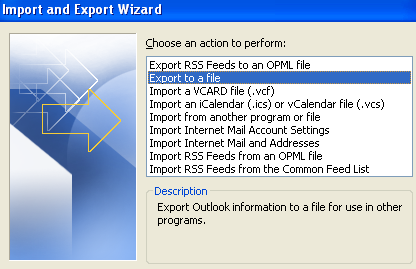
From the list, choose Export to a file and then click Next.
export to a file
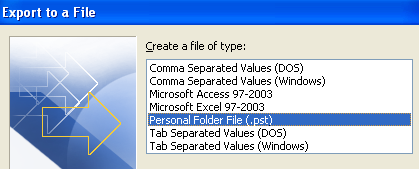
From the list, choose Personal Folder file (.pst). I prefer to export it out as a PST file so that it can easily be imported into another version of Outlook.
personal folder file
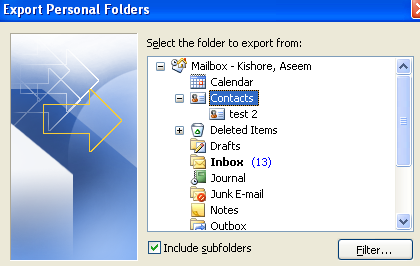
Now you’ll get a list of all of your folders, including the Inbox, Calendar, RSS feeds, etc. Click on Contactssince we want to export Outlook contacts only. If you have created other contact folders inside the main contact folder, be sure to check off the Include subfolders box.
export contact outlook 2007
Click Next and then choose the location for your backup file. Make sure to browse to some other location as Microsoft defaults to a hidden folder. You might also be asked if you want to add a password in order to protect the PST file. If not, just leave the fields blank and click OK. After that, click Finish and you’re done!

Export Contacts from Outlook 2010, 2013

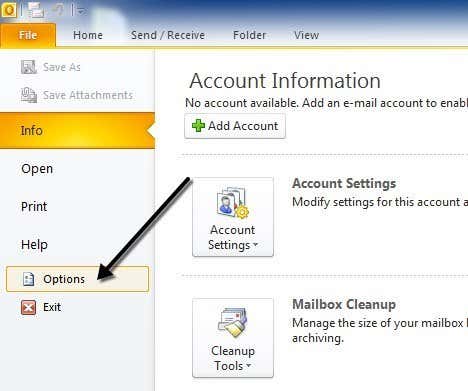
The interface in Outlook 2010 and 2013 is a bit different, so getting to the Export to a file screen requires a different set of clicks. First open Outlook and click on File and then Options.
outlook file options
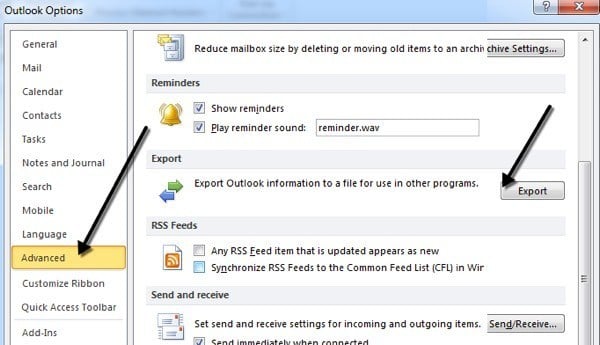
In the left-hand menu, click on Advanced and then scroll down until you see Export.
export contacts
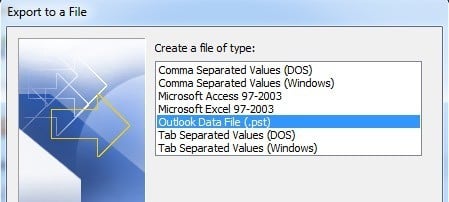
At this point, you’ll get the same Import and Export Wizard dialog that is shown in the above procedure for Outlook 2007. The only difference is the PST file is now called an Outlook Data File rather than thePersonal Folder File.
outlook data file

Export Contacts from Outlook Express

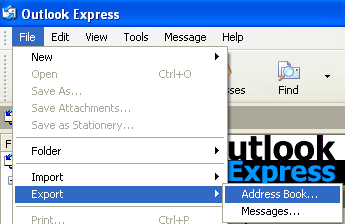
If you’re still running Windows 98, Me, 2000 or XP, then you may be using Outlook Express. Outlook Express has a slightly different procedure, but very straightforward also. First, open Outlook Express and then go to File, choose Export, and then choose Address Book.
outlook express export contacts
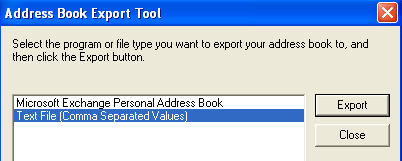
Click on Text File (Comma Separated Values) and then click Export.
outlook express export address book
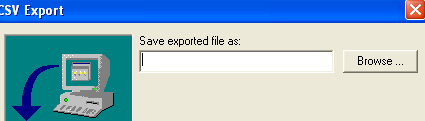
Click Browse to specify a location to save the file or type it in manually.
export contacts outlook
Click Next and then choose all of the fields that you want to export for each contact, i.e. First name, Email address, Street, Company, Phone, etc.
export contacts from outlook
Click Finish and you’re done!

Export Contacts from Windows Live Mail

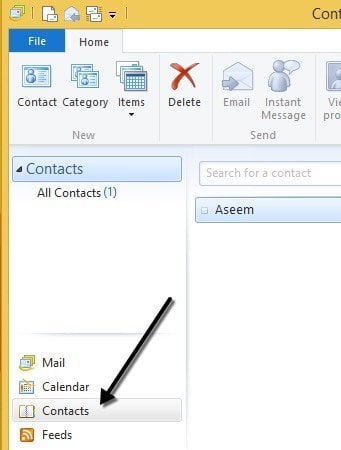
This is probably the easiest of all. Open Windows Live Mail and click on Contacts. It’s got a very similar look to Outlook, which makes it very easy to use.
windows live mail contacts
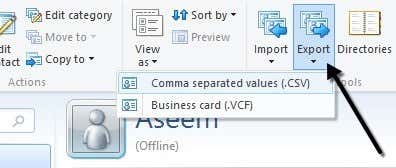
In Windows Live Mail, all you have to do to export contacts is to click on the Export button in the ribbon.
export contact wlm
Super easy! If you have any questions or issues getting your contacts out of Outlook, feel free to post a comment.

How to Fix USB Device Not Recognized in Windows

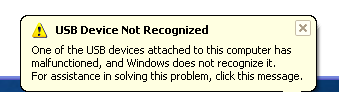
Are you getting a “USB device not recognized” error whenever you plug in a USB mouse, keyboard, or other USB device? I love USB and have 5 ports on my computer so that I can connect my mouse, keyboard, camera, phone, and printer to it all at once!
However, last weekend, my computer stopped recognizing my USB devices! The strange thing about it was that the USB ports were not bad because all of my devices were still getting power to them. I could still charge my cell phone without a problem!
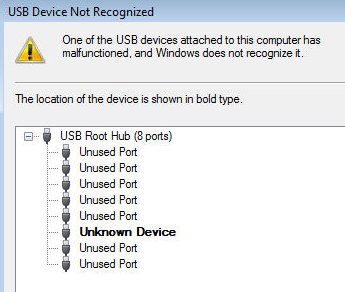
usb device not recognized
So I started with the normal fixing methods, including uninstalling the drivers for my devices and reinstalling them. That didn’t work! Next I tried System Restore thinking that maybe I had installed something and it caused a conflict with the USB system drivers. That didn’t work!
I read online that in order to fix this problem I should go to Device Manager and uninstall all of the devices under USB Controllers. Restarted the computer, reinstalled the USB drivers, but the problem STILL did not go away!
You may also see in Device Manager that the device shows up as an “Unknown Device”.
unknown usb device
So how did I finally fix the problem? Well, apparently it’s a super simple solution! No need to edit the registry, uninstall drivers, or anything of that sort.
Simply UNPLUG YOUR COMPUTER FROM THE POWER SUPPLY. Yes that’s it! Note that this does not mean just turning off your computer because modern computers don’t really turn off when you press the power button as the motherboard still gets power.
First to explain, the motherboard is where all of hardware of the computer is connected to, including the USB ports. Sometimes the motherboard needs to be “rebooted” also because something can go wrong, i.e. all your USB ports suddenly stop working. The small microprocessor on the motherboard will reload the drivers and your USB ports should be back to recognizing all devices!
So first turn off your computer using Shut Down or pressing the power button and then UNPLUG it from the wall outlet. Let it sit for about a minute and then plug it back in.
Hope this helps someone fix that pesky “USB device not recognized” Windows error!

How to Boost Your Wireless Signal

If you have an older wireless router that doesn’t have all the new fancy technology like MIMO, etc, you can still boost your wireless signal range using several methods. Personally, I have never needed to boost my wireless signal at home, but have definitely needed to do so at work.
If you work or live at a place that has a bunch of ways or multiple floors, boosting your wireless signal can dramatically increase your Internet speed. So what are the various ways you can boost your signal?

Buy a Wi-Fi Extender (aka Repeater)

The easiest and best-working method is to simply buy a Wi-Fi extender. Every major brand has one, including D-Link, Netgear, and Linksys. They usually have the words “range extender” in the name of the wireless router.
wifi extender
They are basically normal wireless routers, but instead of creating their own separate network, simply extend the coverage of the currently configured wireless network. You can find a bunch of Wi-Fi extenders here:
If you don’t want to plop down $50 to $80 bucks for this, you can try to create your own Wi-Fi extender! Check out this YouTube video on how to make a Wi-Fi Extender:
You can also check out a great article by LifeHacker that walks you through the steps of creating a homemade Wi-Fi Extender.

Increase Transmit Power on your network adapter

If you have a newer Dell laptop or any computer that is running the Centrino chipset, your computer may not be using the strongest wireless signal that is possible. Why? Well, the new processors have power-saving features that use less energy in order to conserve batter power.
This is great, but it hinders the transmission power of the wireless card also. You can connect to wireless networks that are farther away by boosting the signal on your laptop, rather than boosting the signal on the router.
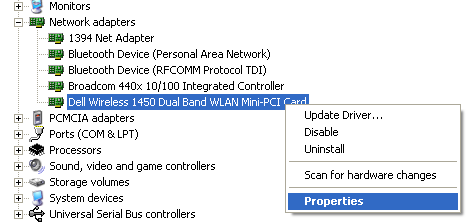
To do this, go to the Device Manager in System Properties by clicking on the Hardware tab. Once in Device Manager, expand Network Adapters and find your wireless card. Right-click on it and chooseProperties.
boost wireless signal
Now depending on what kind of card you have and your drivers, you will have to search through the various tabs and try to find anything that called Power Management or Transmit Power. You can then disable the power-saving features or you can increase the transmit power.
Note that this will only work for newer computers that have power-saving features enabled.

Attach a Wi-Fi signal amplifier

Another way to extend the range of a wireless network without buying a range extender is to buy a Wi-Fi signal amplifier. It basically attaches to your wireless router or access point on top of the antenna. You can buy a bi-directional antenna to amplify both the transmit and receive signals for best performance.
You can find a list of signal boosters here:
Other things that can help extend the range of your Wi-Fi signal is to position the router correctly. Make sure it’s in a wide open area and that it is centrally located.
Also, make sure it’s running on a channel and hertz that is not interfering with your cordless phones, other wireless routers in your neighborhood or apartment, etc.
You can also try upgrading your router firmware and upgrading the drivers on your computer. Finally, if it’s that bad, you might be better off just buying a new router! Any other suggestions to boost your wireless signal? If so, post a comment.

How to Avoid Having to Reactivate Windows XP After Fresh Install

Has your computer reached the point where you are forced to reinstall Windows? It’s a painful point to reach, but it happens to just about everybody! Whether it is uncontrollable spyware, a deadly virus, or simply too many programs installed over the years, a fresh install of Windows can make things a million times better.
Working in IT myself, I find that I have to reinstall Windows at least every 6 months to a year. It simply gets too slow because of all the registry changes and modifications. And it’s also great if you got a used computer from somewhere and you would rather wipe it clean and start fresh.
The only issue with re-installing Windows is that you have to be careful about the reactivation process. By default, if you use the OEM CD that came with your computer when you first bought it, re-installing Windows should be a breeze and you won’t have to reactivate.
However, this may not always be the case. If you don’t use the original CD that came with the computer, you may have to re-activate. Also, sometimes even when you use the same CD, it may not force you to re-activate XP.
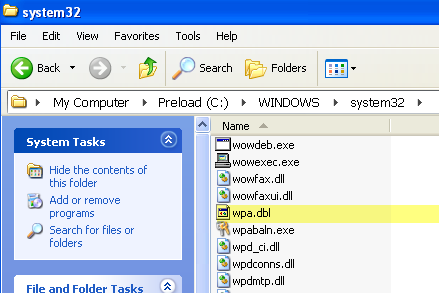
You can avoid having to reactivate XP by simply copying a file from your Windows directory and saving it on a USB stick, floppy drive, or CD. When you first activated Windows, XP creates a file called “WPA.DBL” and stores it in the C:\WINDOWS\SYSTEM32 directory.
wpa dbl
Now copy this file to some sort of external storage device and keep it in a safe place. When you go to reinstall Windows, you’ll reach the point where you have to activate. Decline the activation and complete the installation.
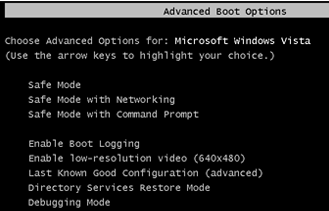
Now you’ll need to restart your computer in Safe Mode by pressing F8 on startup to get into theAdvanced Boot Options menu.
advanced boot options windows
Go to C:\Windows\System32 and you should see a file called WPA.DBL already there. Simply rename it to something like WPA.BACKUP and then copy your backup version of WPA.DBL to the current location.
Restart the computer and Windows should now be activated and working fine. Remember that this will only work if you use the WPA.DBL file on the same computer that it was originally activated on. If you install XP on a different machine and try to copy the WPA.DBL file there, it won’t activate. Basically, XP looks at the hardware of the computer to create a unique profile for just that one computer.

How to Remove and Reinstall All Windows Updates

Have you ever come across a situation where Windows Update gives you the message “An update failed to install” and gives you no other option? This can happen for a host of reasons and the first thing you want to do is search that phrase along with the update that failed to install.
There are some occasions, however, where you have to start from scratch and reinstall all Windows Updates from the beginning. Other than reformatting your computer and then installing every update again, you can also delete the folder that contains the updates and update history.
Once you delete the automatic updates folder, the next time you check for updates or go to the Windows Update website, all updates will be re-downloaded and re-installed.

How to reinstall all Windows Updates

First, you have to turn off the Automatic Updates and BITS service in Windows. To do this, click on Start, thenRun and type in services.msc and press OK.
services
Next, right-click on Automatic Updates service and click on Stop. Right-click on Background Intelligent Transfer Service and click on Stop.
stop windows update
Now we can delete the folder that contains all of the Windows updates applied to your computer currently by navigating to:
C:\Windows\SoftwareDistribution
Note that this will delete the Update history and ALL updates will be reinstalled on your computer. Note that this will not harm your computer in any way.
Now you can go ahead and restart the two services that we stopped earlier. If you are running Windows Vista, type in Windows Update in the search box and press Enter.
Windows Updates should show you that you’ve never checked for updates before, so go ahead and click “Check for Updates” to begin re-installing all updates.
check for updates
In Windows XP, make sure Automatic Updates is set to “Automatic (recommended)” via the Control Panel and then visit the Windows Update website to begin installation of the updates.
Hopefully, once the initial updates are reinstalled, your failed updates will install also.

Speed Up Slow Windows Startup and Boot with Startup Delayer

Is your Windows startup or boot time very long? If you have a lot of applications that startup when Windows loads, you may have noticed that your Windows startup is very slow. Earlier I wrote about speeding up your PC by going into the MSCONFIG tool and turning off useless startup programs.
However, even with lots of startup applications disabled, you may still have a good number that you want to run when Windows starts. Each application with eat up CPU cycles and may also have to read and write from the hard drive (hence the constantly blinking hard drive light when loading up). In this case, you can actually delay the startup of programs till after Windows starts.
startup delayer
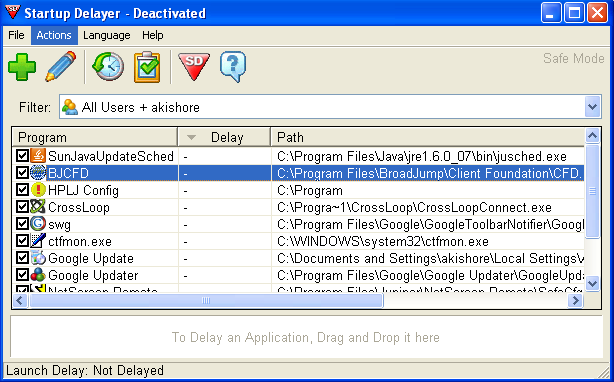
Startup Delayer is a cool program that does just this for you, it speeds up your boot time by allowing you to delay or stop the startup of programs. By default, Windows will try to load up all programs simultaneously when Windows starts, causing lots of contention and overall slowness.
Once you install Startup Delayer, you’ll get a list of the current applications that load up automatically on startup. The nice thing about the program is that it has two modes, safe and advanced. In safe mode, you only see programs that are on the Program List and cannot delete programs from the startup list. In advanced mode, you can actually remove items if you do not want them to start up and you’ll see other programs listed, such as system programs.
speed up windows boot
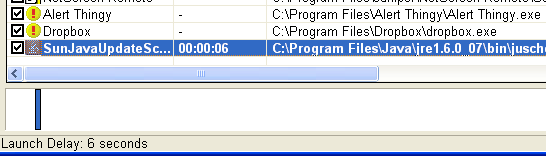
To delay an application, simply click and drag it to the bottom window. When you do, you’ll see that the bar at the bottom is actually a time scale for the time the program load should be delayed. Drag the program around to delay it to the desired amount of time.
delay program load
As you can see, I’ve delayed the SunJavaUpdate program to launch 6 seconds after Windows starts. What you want to do now is to keep adding programs and spacing them out so that they all start at different times.
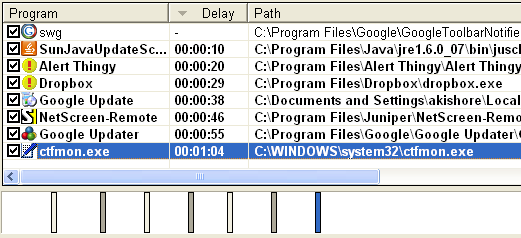
You may want the heavier apps to load later on and lighter apps earlier. For example, you can delay SunJava by 10 seconds and if you have Yahoo Messenger installed and several other messengers, you can delay them by 20 to 30 seconds since they take up more resources.
launch windows faster
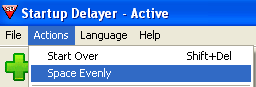
You can also go to the Actions menu and choose Space Evenly and the program will automatically add all programs and space them out evenly across the time scale.
space evenly
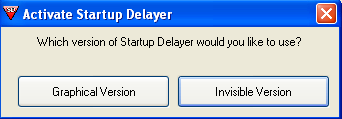
Once you have set the delay times for all programs, you need to activate Startup Delayer by either clicking on the red triangle icon that has SD written in it or by going to Actions and choosing Activate Startup Delayer and then choosing either Use Hidden Version or Use Graphical Version.
activate startup delayer 
Now restart your computer and hopefully you should see your startup time decrease as those programs are not loading immediately! Quick and easy way to speed up a slow Windows computer.