Tuesday, February 10, 2015

How to Format External Hard Drive to FAT32 in Windows

Trying to format a large external USB or Firewire hard drive to the FAT32 file system? Can’t do it? Only see an option for formatting the drive using the NTFS file format? Well if you answered yes any of those questions, then you’re at the right place.
I was recently trying to format my 1 TB MyBook external hard drive in Windows XP to FAT32 instead of the overly forced-upon NTFS format. Why? Well because I needed to connect it to a NAS device and the NTFS permissions were causing the NAS not to be able to access the drive. Simple solution is to use FAT32, no security, no problems. Though it’s sometimes useful to format a USB drive in NTFS format.
Also, formatting a drive in FAT or FAT32 will allow it to be read by other operating systems, such as Mac, Linux, and older versions of Windows such as Windows 98.
Unfortunately, Windows XP and Windows Server 2003 will only format a removable drive in FAT32 if it’s less than 32GB! Hmmm…that pretty much cuts out ALL modern external hard drives!
However, Windows can format a drive that is larger than 32GB in FAT32, but you have to use the DOS command prompt. However, if you have a drive that is 1TB or larger, you may still get an error saying “The volume is too big for FAT32”.
In that case, you can use some 3rd party programs that will allow you to format an external hard drive with the larger size. Let’s go through the different methods. In case you are having problems getting your external hard drive to show up in Windows, read my article on how to change the drive letter for an external drive in Windows.

Format in FAT32 using Drive-Specific Tools

Before we get into using the command prompt and other third-party programs, it’s worth mentioning that some of the hard drive manufacturers have created their own tools for converting a drive which is larger than 32 GB to FAT32. Here is a list:

Format External Hard Drive in FAT32 using DOS

Open a command window by going to Start, then Run and typing in CMD.
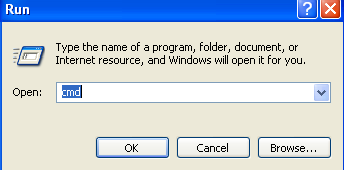
command prompt
Now type in the following command at the prompt:
format /FS:FAT32 X:
Replace the letter X with the letter of your external hard drive in Windows. Windows will go ahead and begin formatting the drive in FAT32!
format external hard drive fat32
There seems to also be an issue when using the command line besides the size limit problem. Namely, it can take forever to format the hard drive for some users. Not sure why, but I’ve seen it enough times and it can be very frustrating to wait 5 hours and then have the whole format fail. If the format is taking longer than an hour, just cancel it and try one of the methods below first.

Format in FAT32 using Verbatim SmartDisk FAT32 Utility

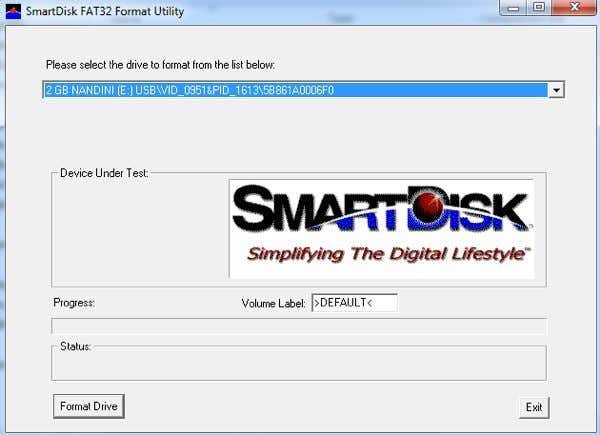
There is a free utility called Verbatim FAT32 Tool which will allow you to convert your hard drive to FAT32 in seconds. I use to recommend a program called SwissKnife, which I mention below, but it’s no longer free and no one really needs to spend $10 to convert a hard drive from NTFS to FAT32. There are lots of other free tools and this Verbatim one is one of the better ones.
Just download it, unzip it and run the tool. It’s a standalone EXE file, so you don’t even have to install it on your system. Choose the drive you want to format, give it a Volume name and click Format Drive!
verbatim smartdisk
It’s a painfully simple program to use and it works really well. If you don’t even want to bother with the command prompt, just download this free tool and use it.

Format in FAT32 using FAT32Format

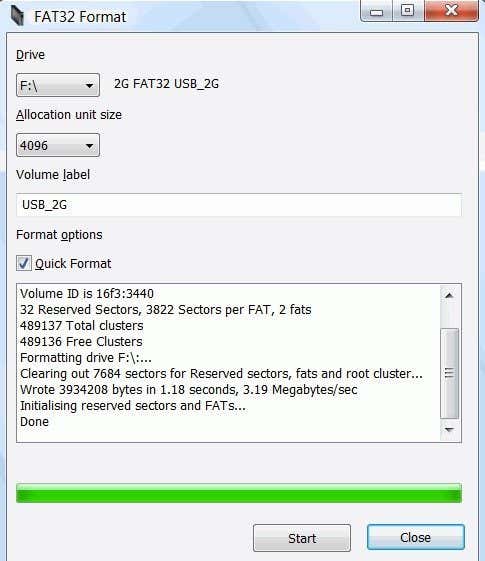
FAT32Format is another free tool you can use to get the job done. Choose the drive, the allocation unit size, give the volume a label, choose whether you want to do a quick format or not and then click Start.
fat32format

I would suggest not checking Quick Format so that way the entire drive is completely overwritten and you’re starting from scratch. I’ve tried this program and it was able to convert my 1TB hard drive to FAT32 without any issues. It did take longer than Verbatim, but I didn’t choose Quick Format, which probably would have been faster.

Format in FAT32 using FAT32Formatter

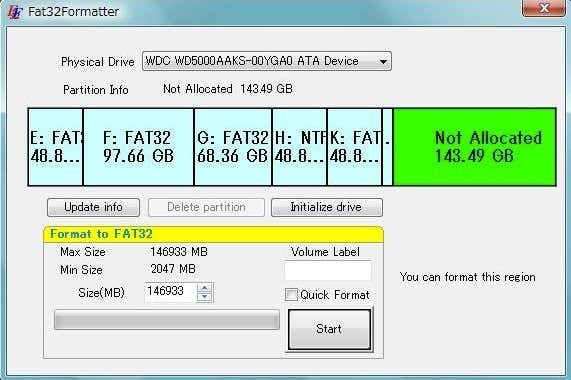
Another option is the FAT32Formatter program from Tokiwa. Using this program, you can see the different partitions on the hard disk and format just one partition to FAT32 instead of the whole drive. It’s probably best not to have a mix of NTFS and FAT32 partitions on one drive, but you can do it if you want or if you need to for some reason. This program will allow you to do that.
fat32formatter

Format in FAT32 using SwissKnife

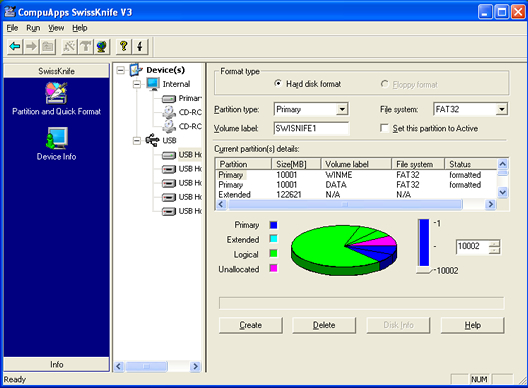
SwissKnife is a nifty little program that used to be free, but not anymore, which you can use to format many types of external drives such as USB, Firewire, PCMIA, SATA and SCSI. The link points to the CNET page, which still has the older free version you can download. You can also use it to create partitions on an external hard drive and it formats faster than Windows.
swissknife
With SwissKnife, you may run into an issue where after the conversion to FAT32, you are left with only a small percentage of the original disk size. For example, if you format a 1TB drive, you might perform the conversion and end up with only 500 MB of space. This can be fixed by first reformatting the drive in NTFS format by performing a quick format.
Once you format the entire drive using NTFS, make sure to view the available space in Explorer and that it matches the size of the hard drive. Once you do that, go ahead and use SwissKnife to perform the conversion to FAT32.
So next time you want to format a hard drive in FAT32 and Windows only gives you an option for NTFS, make sure to follow one of the methods mentioned above.

How to Clear or Delete My Recent Documents in Windows

Looking for a way to delete the recent documents list in Windows? Don’t you hate how many things Windows tracks, like all of the recent documents you have opened in ANY program? Sure, most of the time I don’t care and leave it enabled, but there are times when you would rather that data not be visible, i.e. when you are on a shared computer or a public computer.
If you want to disable recent documents and remove/clear your most recent documents, it’s actually a pretty simple process. The most recent list of documents was removed by default from the Start Menu starting in Windows 7, but it still exists in the jumplist.

Clear Recent Documents Windows 7 & 8

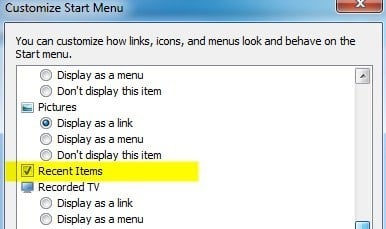
In Windows 7 and 8, you won’t see any list of recent documents by default in the Start Menu; however, it does still exist. If you right-click on the Start Menu, choose Properties, click on the Start Menu tab and then click on Customize, you’ll see a checkbox for Recent Items towards the bottom.
recent items start menu
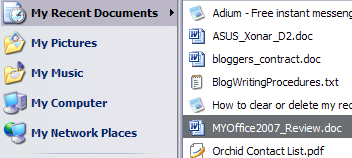
If that is checked, then you will see the recent documents in the Start Menu like shown below:
recent items
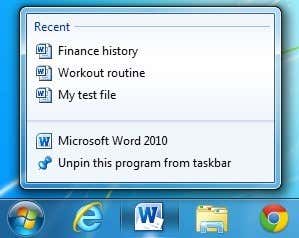
In addition to the Start menu, if Recent Items is enabled, you’ll also see the list of recent documents when you right-click on a program in the taskbar. This is called the jumplist and it basically includes a customized menu for each program.
jumplist
Now there are two ways to get rid of items from a jumplist or from the list of recent documents in Windows 7 and higher: either clear the jumplist or prevent Windows from showing any recent documents at all.
I have already written a detailed post on how to clear jumplists in Windows 7, so read that first. However, that just temporarily clears the jumplist. Once you open more documents, the jumplist will again list out recent documents.
If you go back to the Customize dialog where you enabled Recent Documents, you’ll see two options at the bottom for Start Menu Size:
start menu size
The item we are interested in is Number of recent items to display in Jump Lists. Go ahead and set that to and Windows will no longer show the list of recently opened documents. When you right-click on a program from your taskbar, the list will be gone.
clear jumplist
However, this is a bit misleading in two ways. Firstly, when I went ahead and opened Word, all of my recent documents were listed there! So to truly remove the list of recent documents, you have to clear it from the application itself.
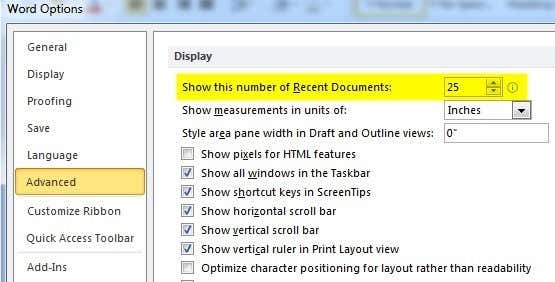
For Word, open the program, click on File and then Options. Click on Advanced in the left menu and scroll down till you see the Display section.
word options
Here you will see the Show this number of Recent Documents option. Go ahead and change that value to 0. Now the list will be gone from Word itself.
Secondly, setting the number of recent items to display in jump lists to 0 is misleading because even though you may not see the list anymore when you right-click, Windows is still storing the history! For example, go ahead and change the value back from 0 to something else like 5. Now when you right-click on Word, for example, you’ll see the list is back!
To prevent Windows from storing the history altogether, you have to right-click on Start, go to Propertiesagain and click on the Start Menu tab. This time don’t click on Customize!
store recent items
You will see under the Privacy section a checkbox for Store and display recently opened items in the Start menu and the taskbar. Go ahead and uncheck that box and now Windows will no longer store the history of your recently opened documents for any program. As mentioned before, the individual program itself may store a list of recent documents, which has to be cleared manually.

Clear Recent Documents Windows XP & Vista

I’m going to explain the method for clearing the my recent documents list in Windows XP, but the same holds true for Windows Vista. So here’s a step by step guide to deleting your my recent documents list:
recent documents
First, right-click on the Start Button and choose Properties:
start menu properties
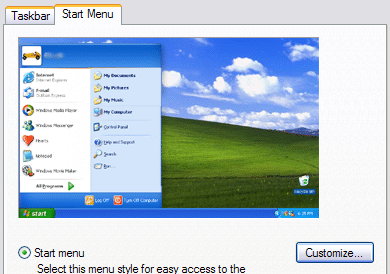
You’ll now be in the Start Menu and Taskbar properties dialog box. You should already be on the Start Menu tab. Go ahead and click on the Customize button.
start menu customize
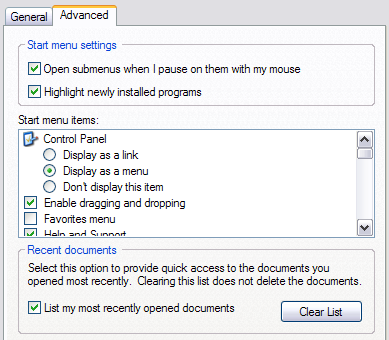
You should now be viewing the Customize Start Menu dialog box. Go ahead and click on the Advancedtab.
clear recent documents
At the bottom, you’ll see a section called Recent Documents. Click Clear List to clear the most recent list of documents. If you do not want Windows to record your recent documents at all, uncheck the List my most recently opened documents box. That’s it!
Now the option on the Start Menu for most recent documents will be removed and nothing will be recorded! 

Forgot Your Windows password? Recover Your Lost Password using Login Recovery!

Forgetting your password to log into Windows can be a very frustrating experience, especiallyif the hint doesn’t help either! There are a couple of programs out there that can help you, but there is one called Login Recovery that caught my eye. The reason it caught my eye is because it’s fairly simple to use even if you are not very techie person. Unlike some of the other programs or methods to crack the Administrator password that change keys in the registry, involve Linux, or ask you to install another copy of Windows, Login Recovery is an easy to use web-based service.
Unfortunately, it’s not free, but you don’t have to pay if you don’t want too. Firstly, they will tell you whether or not the password could be fully decrypted or not. If not, you’re done and you don’t pay anything. If the password was found, then you have the option of paying if you want to see it.
login recovery nav
The program is called Login Recovery and it consists of three parts in order to recover your password:
1. First, you download a small application on a working computer and pop in a CD. Run the program and it will automatically create a bootable CD for you by burning an ISO image onto the CD.
login recovery
2. Once the CD has been created, you take it out and put it in the computer that you are currently locked out of. You need to make sure that the computer is connected to the Internet (probably via Ethernet) and that the computer is set to boot from CD. You can read my previous post on changing the boot order in the BIOS.
3. When the CD loads, it will automatically start looking for the passwords and will try to upload them to their site. If you can’t get an Internet connection on the locked computer, you can save the passwords onto a USB stick.
4. If you have to copy the passwords onto a USB stick, go to Results tab on their website and upload the file that you saved.
If the file was uploaded directly from the locked computer, then don’t worry about step 4. All you have to do now is wait a little while and you’ll get an email when the process is complete. If the username has the word “REVEAL” next to it, that means the password was successfully obtained. At this point, you’ll have to pay and then you’ll be able to see the password.
The Login Recovery process is not guaranteed, especially if the password is complex. I tried it on my computer, but it could not crack it because I have a password that is 10 characters long with upper case, lower case, numbers and symbols! So if you had a password like that, it will be highly unlikely to crack it. However, most people use simple words or short phrases as passwords, so that’s why the site states that almost 98.5% of the passwords submitted were cracked successfully!
The last option, which is pretty nice, is if the word “RESET” is next to the username. That means the password could not be obtained, but it can be reset. This will only work on older versions of Windows, but if you see the word, you’re set. You have to boot from the CD one more time and make sure the computer has an Internet connection.

How to Diagnose, Check, and Test for Bad Memory

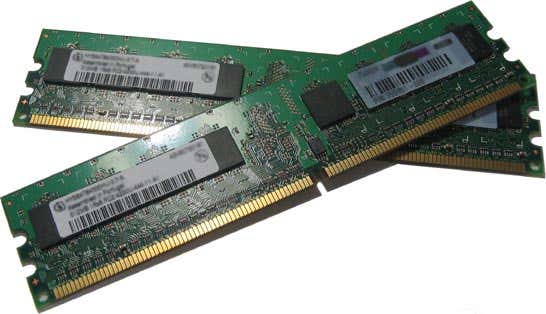
Though rare, there are times when the memory chips (aka RAM) on your computer can go bad. They usually outlast all other components on a PC because they have no moving parts and use very little power. Since memory chips are one of the most essential components to any computer, any problems or issues will immediately manifest themselves in strange and sometimes confusing ways.
It’s also hard to instantly diagnose a problem as a RAM problem because most PCs have multiple RAM chips and not all of them will fail at once. When one fails and others work properly, a variety of odd behaviors will start to occur. Here are some symptoms of bad memory on a PC.
ram chips

RAM Issue Manifestations

1. Windows will freeze for minutes at a time regardless of what application you are using. It may take 2 minutes to open Word or 3 to 4 minutes to open IE. Usually performance issues are the first to appear and can easily be misconstrued as a virus or malware.
2. You get the infamous blue screen of death, but without having added any new hardware or installed any new software. If you’re getting the blue screens and haven’t installed any new drivers or Windows updates, it could be a memory issue causing the blue screen.
3. The PC restarts randomly while you are in the middle of doing something. Random restarts can also be attributed to a lot of different factors, but if you are having this problem in combination with any of the other mentioned, then it’s more than likely a RAM issue.
4. You start to notice files becoming corrupt on your system. If you’re working with a lot with certain files and notice that they are not saving properly or the data is being corrupted, you can narrow it down to the hard drive or memory. If you’ve run diagnostics on the hard drive and all is fine, then these read/write errors can be caused when parts of the file are stored in RAM.
5. You start to see strange colors or lines appear on the screen or things look garbled suddenly. Sometimes the memory issue can be so bad that the data being sent to the screen becomes corrupt and therefore displayed incorrectly.
6. When you boot the computer, you hear a beep, multiple beeps and a continuous beep. Depending on your manufacturer, a memory problem will be reported with a series of beeps. I’ve seen this a lot of Dell machines. It’s almost always a RAM problem when the computer beeps.

Diagnose RAM Problems

The next step is to actually determine whether it is physical RAM installed on your PC that is causing problems. You can test this in one of two ways: either run software that checks the RAM or physically open the computer and switch out the RAM.
The ideal method would be to open the computer and take out one stick of RAM at a time and see if the problems go away. If you have two sticks, for example, take out one and restart the computer. If the problems persist, turn off the computer and put back the one you took out and take the other stick out.
If you have more than two sticks of RAM, follow the same procedure. If you only have one stick of RAM, then you’ll have to purchase another stick or try to use a compatible stick from another computer, if possible. Each computer takes a specific type of RAM, so you really have to check to make sure a stick from another PC will be compatible with yours.
On the software side, there are several programs and tools you can use to troubleshoot memory issues.

Windows Memory Diagnostics Tool

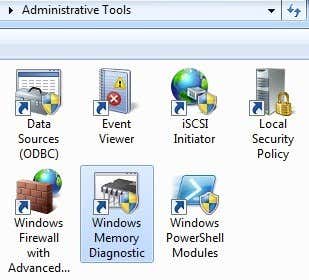
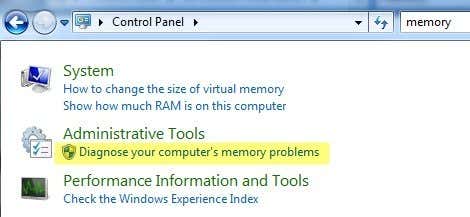
The easiest way to start is to use the Windows Memory Diagnostics Tool built into Windows. To get to it, open Control Panel and then click on Administrative Tools. You can also open Control Panel and just type the word memory into the search box. You’ll see a link to diagnose your computer’s memory problems.
windows memory diagnostic
admin tools memory
It’ll then ask you if you want to restart immediately or run the test the next time you reboot. The computer will boot into the diagnostic tool and start running the test, which is broken up into two separate passes.
running memory test
At the bottom you’ll see a Status field, which will show you any problems that have been detected. You can also press the F1 key and change a couple of options like the test type (Basic, Standard, or Extended), the cache setting, and the pass count. I have found this default test to be very handy and accurate over the years.

memtest86

memtest86 is by far the most popular amongst the memory-checking crowd and works very well. It’s been around since the 1990’s and has been recently updated to version 5.1. There is also a beta v6 in the works at the time of this writing.
In order to use it, you have to burn the ISO image that you download to a CD and then configure the PC to boot from the CD drive first. This is exactly what the Windows Memory Diagnostics Tool does, but it’s all built in and therefore doesn’t require these two extra steps.
What I like about memtest86 is that it also works with Mac or Linux computers too. So if the memory on your Mac system or Linux system is possibly bad, you can easily check using this tool.
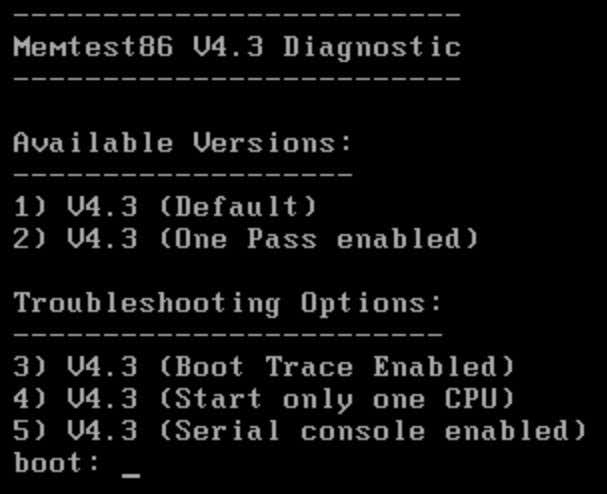
Once you boot to the CD, you’ll get a menu with a couple of different options. If none of it makes sense, don’t type anything and it will automatically default to the first option.
memtest86 options
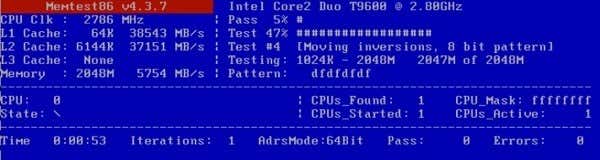
The memory test will begin and it’ll show you at the bottom right if there are any errors.
memtest86
Memtest86 has a bunch of memory tests that it runs on the system, so it takes quite a bit longer than the Windows memory tool. It’s a great tool and pretty much the industry standard for memory diagnostics.
There are other tools out there that do similar memory checks, but memtest86 is the most exhaustive and accurate out of all of them. If your memory is bad, the best place to buy RAM is from Crucial.com because it will only show you RAM that is compatible with your specific system.

How to Restart Windows in Safe Mode

Need to get into Safe Mode on your Windows PC? If you’re not able to boot your computer normally, you can try to enter safe mode, a diagnostic mode for Windows that lets you troubleshoot problems that prevent normal booting.

In Safe Mode, Windows only loads the most essential services and drivers in order for it to run. All other normal Windows settings and start up programs are disabled in order to allow the user to fix the problem with their computer.
In this guide, I am going to go through the steps to get into Safe Mode in Windows XP, Vista, 7, 8.1 and Windows 10.
Note that if you installed a driver or just recently made a configuration change to your computer, you may want to try the “Last Known Good Configuration” before going into safe mode in Windows 7, Vista and XP.
Last Known Good Configuration loads the last working version of Windows. However, it is replaced each time you log into the computer, so if a problem has occurred, make sure to try this option BEFORE logging onto the computer again.
In Windows 8 and Windows 10, the Last Known option is no longer included. Instead, they have other options like Refresh, Reset (Reinstall), Restore, etc. I’ll go into more details below in the Windows 8/10 section.
Also note that there are three types of Safe Mode, so read the descriptions below to figure out which one is best for you.
Safe Mode – The basic option that loads Windows with a GUI interface and is usually what most people should choose when troubleshooting their computer.
Safe Mode with Networking – If you need access to the Internet or the network while in Safe mode, then this is the option to choose. This mode is useful when you need to fix a problem that requires an Internet connection so that you can download updates, drivers, or other files to help fix your problem.
Safe Mode with Command Prompt – This mode will load with just the MS DOS command line prompt. This is useful if you need to run a DOS command like fixboot or chkdsk.

Safe Mode in Windows XP/Vista/7

To get into the Safe Mode in Windows XP, Vista or 7, re-boot the computer and then press and hold the “F8 Key” which will then bring up the “Windows Advanced Options Menu“. Scroll down to “Safe Mode” using the arrow keys and press Enter.
windows safe mode
Note that sometimes if you press and hold the F8 key, some computers will start to beep annoyingly, so in that case, simply hold the F8 key continuously during the boot up period.
If you are still not able to get into Safe Mode, you can try to kill the power on the computer to turn it off and then turn it back on. If Windows shuts down unexpectedly, it will usually bring up the Advanced Boot Options menu automatically. If that doesn’t work, you can read my previous post on getting into Safe Mode if F8 is not working. This method, however, requires you to be able to log into Windows in order to tell it to boot into safe mode on the next restart.

Safe Mode in Windows 8/10

In Windows 8 and Windows 10, the process of getting into safe mode is completely different. The F8 key no longer works because the boot process is too fast.
The only way to get into safe mode is to boot into System Recovery Options, which is where you can perform various troubleshooting tasks including starting in safe mode.
I’ve already written about how to boot to the Windows 8 System Recovery Options screen, but the process is slightly different for Windows 10, so I’ll mention it here. In Windows 10, there are two ways to get to the recovery options screen. Firstly, you can click on the new Start button, which is back again in a different form, and then hold down the SHIFT key and click on the power button.
While still holding down the SHIFT key, click on Restart. The other way is the same as Windows 8, but it just looks a bit different. Click on the Start button and then click on Settings as shown above.
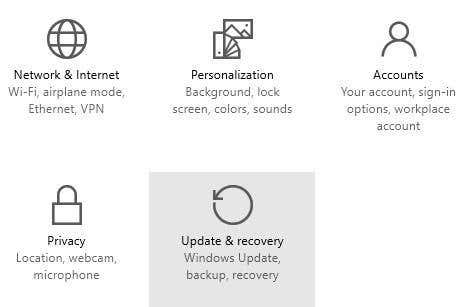
This will bring up a new Settings dialog that basically replaces the PC Settings dialog in Windows 8. Here you will click on Update & recovery.
update and recovery
Now you’ll see the options to refresh your PC, reinstall everything or restart in advanced startup mode.
advanced startup
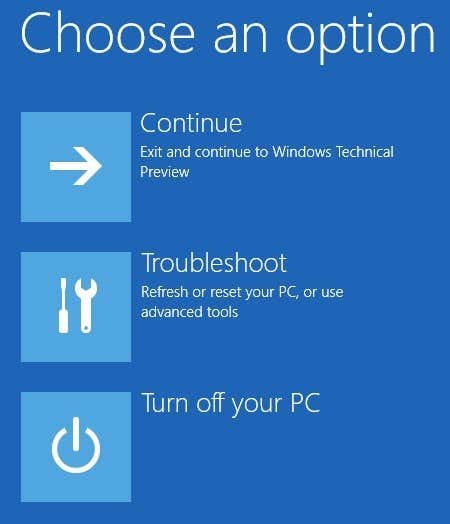
At this point, the process to get into Safe Mode in Windows 8 or Windows 10 is the same. You’ll now see three options: ContinueTroubleshoot and Turn off your PC.
recovery options windows
Now just follow the instructions on my article on booting to safe mode in Windows 8. You basically click on Troubleshoot and go from there. Windows 8 and Windows 10 are also a lot smarter than previous versions and will normally bring up the recovery options automatically if a problem is detected while booting.
If you have any questions about getting into safe mode on any version of Windows, feel free to post a comment. Enjoy!