Tuesday, February 10, 2015

Change How Windows 7 Prompts for Admin Approval Mode

Windows 7 accounts that have administrative privileges operate differently than admin accounts in previous versions of the operating system. Rather than giving administrative accounts complete and unbridled access to everything on the PC, these accounts operate as normal user accounts until an action requiring admin privileges pops up. Then the account enters Admin Approval Mode so the user can approve the action.
Much improved over Windows Vista’s handling of admin approval, Windows 7 strikes a balance between security and usability. Fortunately, Microsoft makes it possible to further customize how Admin Approval Mode operates on a PC.
Depending on where your computer is located and who uses it, you can upgrade or downgrade your PC’s security by changing how Windows 7 uses Admin Approval Mode.

Changing How Admin Approval Mode Works

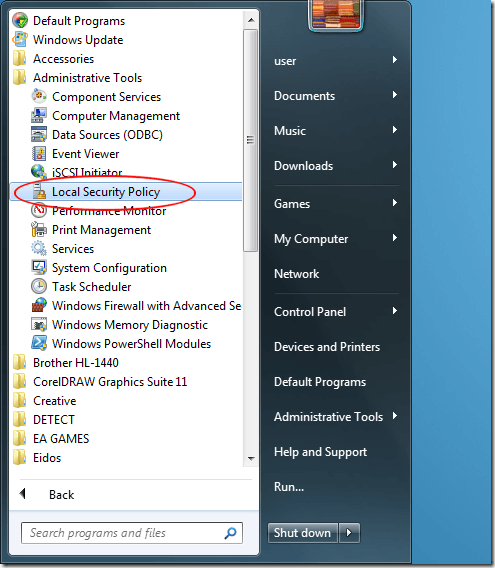
To make changes to how Admin Approval Mode works on a Windows 7 PC, begin by logging into the operating system using an account that has administrative privileges. Click on Start>All Programs>Administrative Tools>Local Security Policy.
Startup Windows 7 Local Security Policy
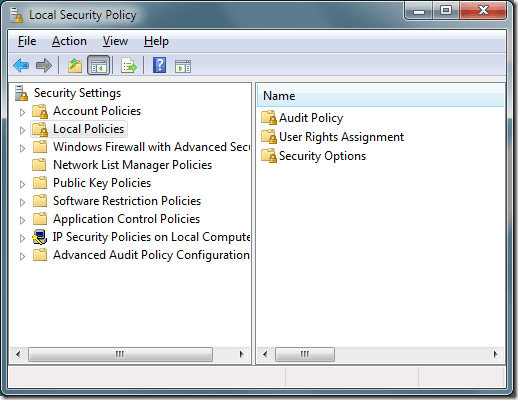
You should now be looking at the Local Security Policy options window.
Windows 7 Local Security Policy Options
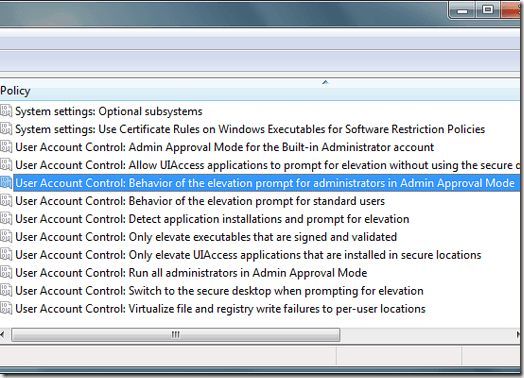
In the left hand pane, click on the folder titled Local Policies and then on the folder labeled Security Options. Locate an option in the right hand pane titled User Account Control: Behavior of the Elevation Prompt for Administrators in Admin Approval Mode. Right click on this option and chooseProperties from the menu.
Windows 7 Admin Approval Mode Options
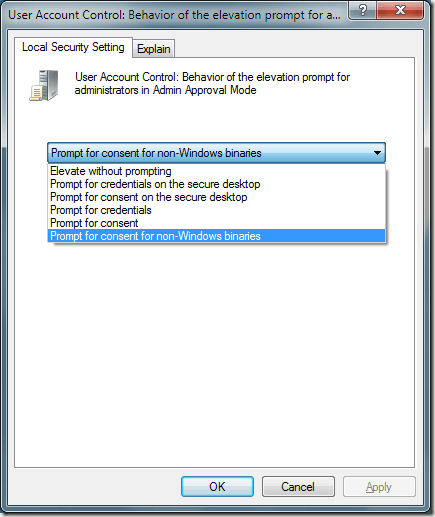
You will notice that you have six options in the drop down menu in the properties window.
Enable and Disable Admin Approval Mode Options in Windows 7
Below is a description of each option for Admin Approval Mode elevation.

Six Admin Approval Mode Options

Each of the six Admin Approval Mode Options forces Windows 7 to operate differently when it comes to elevating approval for applications and functions that require approval to run in the operating system.

Elevate Without Prompting

This is the most convenient but also least secure option. Whenever an application or function tries to run that would normally require approval from an administrator, the application or function will run automatically as if it were already given permissions to run. Unless your PC is in a super secure location isolated from networks, this is not a wise choice.

Prompt for Credentials on the Secure Desktop

This option is more secure than the default setting. Whenever an action pops up requiring approval from an admin, Windows 7 will actually prompt the user for a username and password on the secure desktop.

Prompt for Consent on the Secure Desktop

Rather than prompting for a username and password like the option above, Windows 7 will simply ask the user to approve the action on the secure desktop.

Prompt for Credentials

This option operates similarly to the option above titled Prompt for Credentials on the Secure Desktop except that the user types in the username and password without the added security of the secure desktop.

Prompt for Consent

Like the option above titled Prompt for Consent on the Secure Desktop, this option simply asks the user to approve the action but does so without the added security of the secure desktop.

Prompt for Consent for non-Windows Binaries

This is the default Admin Approval Mode option. With this option, users are required to consent to an action only if it requires approval and is not a verified Windows 7 action or executable.
Binaries are simply compiled executable code synonymous to applications or programs. Second only to the Elevate without Prompting option above, this is one of the most liberal Admin Approval Mode options.
Windows 7 strikes a good balance between security and an uninterrupted computing experience but still allows you to further customize how you consent to actions that require admin approval. By altering the Admin Approval Mode options, you can create a customized operating system environment allowing you to increase or decrease security depending on your personal need for administrative security.
Setup Internet Streaming TV in Windows Media Center

Windows 7 Media Center has many powerful TV watching capabilities. For example, Media Center can be used to watch live television, record television, and watch archived TV shows via playback.
However, some features need to be setup in order to work correctly and Windows Media Center does not come configured to watch TV by default. This article focuses on how to watch archived TV shows via playback, as watching live TV and recording live TV require a PC TV tuner, which the majority of people do not have.
Windows Media Center
Before we get started, it should be noted that Windows Media Center playback TV is much like Hulu, in that you can simply watch reruns of your favorite television shows.
To get started, launch Windows Media Center using the path Start > All Programs > Windows Media Center. If this is the first time that you have used Windows Media Center, you will be prompted to choose Media Center settings. For now, just choose the option for standard settings. Upon doing so, you will be presented with the Windows Media Center home screen.
Windows Media Center
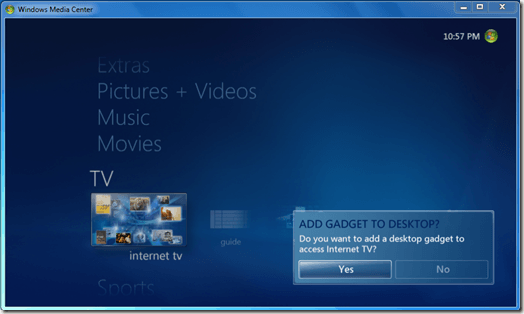
You may be prompted with the option to add the TV gadget to your desktop. This is not necessary, but is convenient if you are going to be using Windows Media Center TV on a frequent basis.
If you have not yet done so, scroll down so that the TV option is in focus and active. Click the option labeledinternet tv.
internet tv
The next screen is some simple licensing that you will need to agree to. Click the box titled I have read and understand the Terms Service and Privacy Statement and click the Install button.
Free Streaming Internet TV
Upon doing so, Windows Media Center will download any necessary updates. When the updates finish, Windows Media Center internet TV will be installed.
Internet TV Installed
You can simply click the Watch Now button next to any show to watch it. From there, you will be presented with the option to watch Full Episodes or Clips. Choose your preference and click a selected episode. You will be presented with a synopsis for each particular episode, detailing a brief overview and summary.
synopsis windows media center
Click the play button. Now, you may be presented with the next step. Windows Media Center works in combination with Adobe Flash Player. Thus, you may need to install Flash Player. To do so, check the agreement box and click the Update button.
Internet TV Update
After the Update finishes, the episode will start playing…
CSI CBS Episode on Windows Media Center
Now that Windows Media Internet TV is updated and ready to go, you can use the guide feature as well. At anytime, you can click the home button or back button to return to the main screen. Click the home button, which is the green globe.
Windows Media Center Home button
Once back at the Windows Media Center home screen, click the Guide button.
Windows Media Center guide
This will launch the Windows Media Center TV guide screen, which is very handy for finding shows quickly and easily.
Windows Media Guide
That’s all there is to it. Windows Media Center Live TV is simple to use, but does require some specific steps and updates before it can actually be used.

Increase the Memory to an XP Mode Virtual PC in Windows 7 Professional

If you opted for the Professional version of Windows 7, you have instant access to XP Mode using the Windows Virtual PC application. It comes with a fully licensed version of Windows XP offering you the ultimate in backward application compatibility.
However, some applications in XP Mode need more memory to run than others. Learn how to increase the memory to an XP Mode Virtual PC in Windows 7

XP Mode Memory in a Virtual PC

When you run XP Mode in Windows 7 Professional, you are really running the Windows Virtual PC application that loads a fully licensed version of Windows XP. Just like a real computer, Virtual PC needs to have access to a processor, a video card, and memory to run the operating system.
The Virtual PC in XP Mode uses some of your computer’s physical memory to run. When you created the virtual computer, 512MB of memory were allocated to XP Mode by default. However, if you have free RAM in your computer, you can allocate more memory to Windows Virtual PC during XP Mode to make applications run faster and more efficiently.
Keep in mind however, that the more memory you allocate to XP Mode, the less your real computer has to use. Of course, this only occurs when you are running the Virtual PC. Generally, you should allocate about 1GB of memory to XP Mode to avoid slowdowns and error messages associated with running out of memory while you run your older applications.

Increasing Memory to a Virtual PC for XP Mode

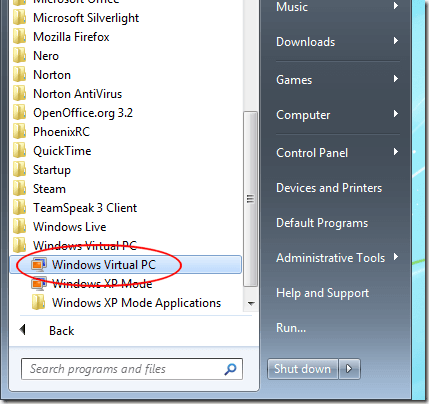
Click on Start>All Programs>Windows Virtual PC>Windows Virtual PC.
Open Windows Virtual PC
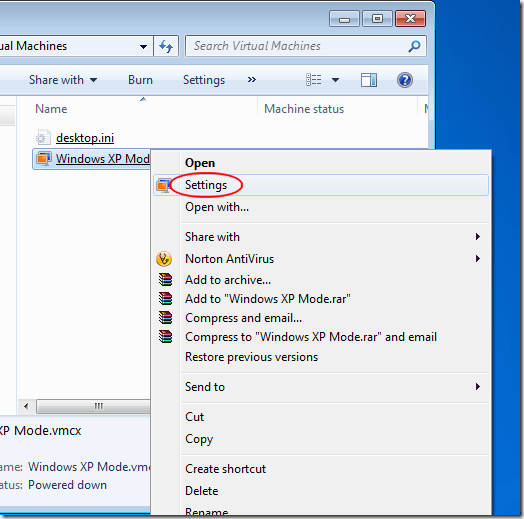
In the Virtual Machines window, right click on your XP Mode Virtual PC and select Settings from the menu.
Windows XP Mode Settings
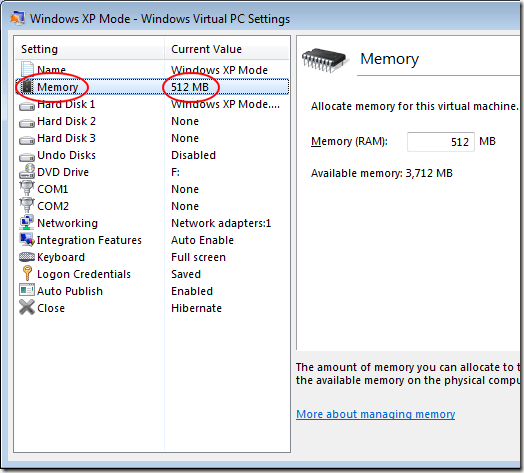
You should now be looking at the Windows XP Mode – Windows Virtual PC Settings window. Click on the Setting labeled Memory and note how much memory is currently allocated to your XP Mode Virtual PC. If you are like most people, the value should be 512MB.
Memory Allocation in XP Mode
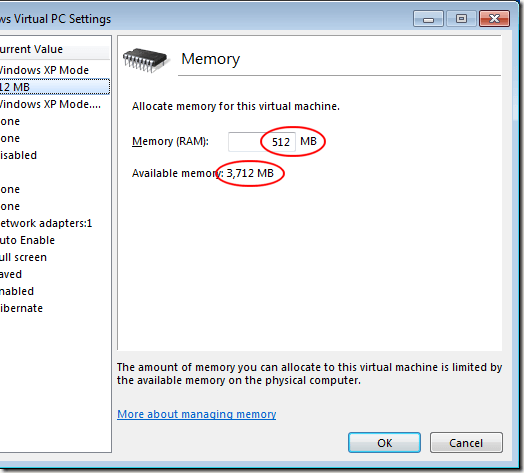
Look on the right hand side of the window and notice the value next to Memory (RAM). It should be the same value that you noted above. Now note the value next to the label Available Memory. This is the maximum amount of memory you can allocate to your XP Mode Virtual PC because it is the amount of free memory you have in your computer.
Increase the Memory Available to Windows Virtual PC XP Mode
In the Memory (RAM) box, type in a new number that represents the amount of your computer’s memory you want allocated to the Virtual PC during XP Mode. A good amount to increase it to is 1GB. To increase the memory to 1GB, type 1024 in the box (1024MB = 1GB). When done, click the OK button.
Using your computer’s free memory, you can increase the amount of memory allocated to Windows Virtual PC in XP Mode to just about any value you want. You just can’t allocate more than the amount of free memory you have in your computer.
Many users find that the default value of 512MB isn’t quite enough and opt to increase it to 1GB. Since the memory in Virtual PC is measured in MB, you should use the value 1024 to allocate 1GB of memory to XP Mode.

Setup Surround Sound in Windows 7

Buying speakers and a good sound card is the first step to getting surround sound from your Windows 7 PC. However, even after you place your speakers and install the drivers, you still need to setup your surround sound system. Learn how to setup a surround sound system in Windows 7.

Surround Sound and Windows 7

It takes some specific hardware and software to achieve surround sound from a Windows 7 PC. First, you must INVEST in either 5.1 or 7.1 speakers. With 5.1 surround sound, you get the following speaker configuration:
  1. Left front
  2. Right front
  3. Center front
  4. Left rear
  5. Right rear
  6. Subwoofer
The typical 7.1 surround sound configuration adds two more speakers offering you:
  1. Left front
  2. Right front
  3. Center front
  4. Left rear
  5. Right rear
  6. Side left
  7. Side right
  8. Subwoofer
Second, you have to install the drivers for your sound card and install any drivers and software that shipped with your speakers. Once you have your speakers properly placed, you are now ready to setup surround sound in Windows 7.
Note that even though you have surround speakers, there are times when you may want to revert back to stereo, mono, or some other sound configuration. Many people report hearing better sound using a stereo setup when the original source of the sound was recorded in stereo. The same is true with other configurations. Knowing how to setup surround sound in Windows 7 will allow you to quickly switch arrangements to get the best sound from your PC.

How to Setup Surround Sound in Windows 7

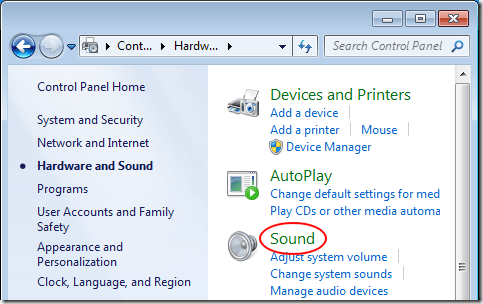
Begin by clicking on Start>Control Panel>Hardware and Sound>Sound.
Open Sound Features in Windows 7
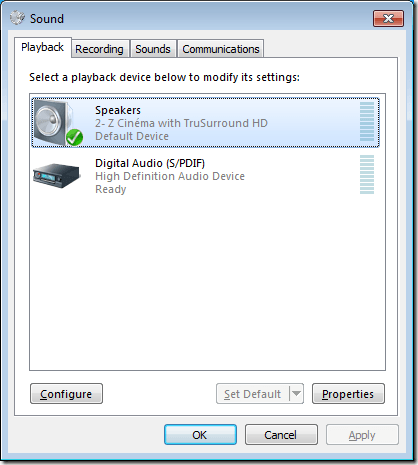
In the Sound window, locate your sound device, click on it once, and then click on the Configure button. Note that you may have several sound devices selected here. Make sure the sound device you are about to configure is set as the default sound device.
Configure Surround Sound Device in Windows 7
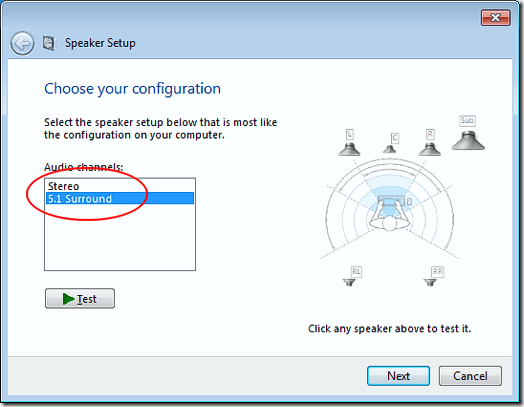
In the Speaker Setup window, note the types of configurations of which your speakers are capable. In our example, the sound device on our test computer is capable of Stereo and 5.1 Surround. Yours may be capable of more or fewer depending on your hardware.
Setup Surround Sound in Windows 7
Select the configuration you want in the Audio Channels box. Note that the picture to the right changes depending on your choice. For example, choosing Stereo removes all but two of the speakers pictured. 5.1adds four additional speakers and 7.1 adds five additional speakers.
Make sure your speakers are turned on and the volume is turned up enough so you can hear them. Click theTest button and listen as Windows 7 tests each of the speakers in your setup. Note any speakers that are not producing sound and adjust the volume accordingly so you can comfortably hear sound coming from each of the speakers.
When finished, click the Next button. Here you can further customize your speakers by telling Windows 7 which speakers are present in your setup. Typically, you do not have to make any changes here unless you have a specific reason for muting or turning on or off certain speakers.
When done, click the Next button. On this window, much of the same logic applies as on the last one. Unless you have a specific reason for turning off these speakers, leave everything checked and click the Nextbutton. The last screen lets you know that configuration is complete. Click the Finish button and you are done setting up surround sound in Windows 7.
Windows 7 allows you to customize your speakers when setting up surround sound. Using the built-in sound utility in Windows 7, you can test, turn on, turn off, and reconfigure your surround sound. If you later decide to make changes to how surround sound operates, run the utility again and make the changes you want to make.

Configure Windows 7 for Maximum Security

Out of the box, Windows is not by default configured for maximum security, although it does offer several advanced settings that can be configured to offer tighter defense. Often times when we get a new computer or install a new version of Windows, we jump straight to using the operating system and installing our favorite programs and apps, without considering setting up the actual configuration options that Windows offers.
Windows 7 Security Settings
If you want to lock down Windows for max security, you might want to consider adjusting the following settings:

Set Internet Options

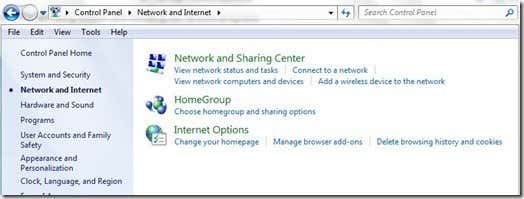
The internet options for Windows, accessible at Start > Control Panel > Network & Internet > Internet Options, control basic Windows + internet functionality, but they also are tightly knitted into Internet Explorer, the default Windows browser.
Windows Internet Options
Internet Explorer is a bit of a virus magnet, although the latest version is much improved. Even so, as mentioned above, IE is more rooted into the actual operating system compared to a browser that you would download, such as Chrome or Firefox, so these Internet Options are something that I like to set to maximum security whenever setting up a new Windows install.
Set Internet Options for your Windows computer accordingly, the way you want them. For max security and maximum performance, you may want to consider the following settings:
- Security tab
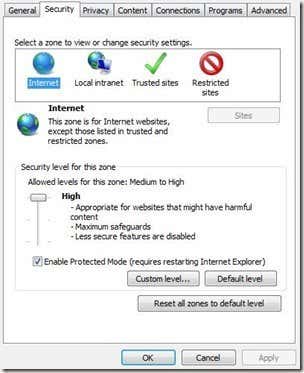
Set each zone, Internet, Local intranet, Trusted sites, and Restricted sites to high by sliding theslider to the upward most setting. Also, click to check the Enable Protected Mode for each zone.
Internet Options Security Tab
*These settings will effect how Windows handles Internet Explorer, but also some other applications that require internet access too. If you find that setting a zone to high causes implications with a program, such as Skype, you may want to lower the zone security setting from High to Medium-high, or set custom security preferences for that zone using the Custom level… option.*
- Privacy Tab
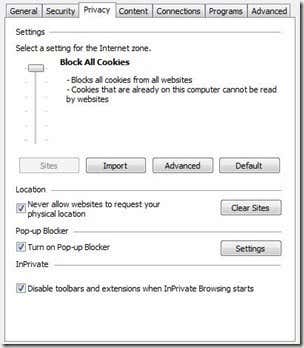
The Privacy Tab mainly controls how Windows handles cookies, but it also contains some other internet preferences too. For max security:
Set the Internet zone setting to Block All Cookies. Also, check Never allow websites to request your physical location, Turn on Pop-up blocker and Disable toolbars and extensions when InPrivate Browsing starts.
IE Block all Cookies
Also, select the Settings button under the Pop-up Blocker listing and set the blocking level to High.
IE Blocking Level
Finally, with Internet Explorer locked down and general Internet Options for Windows more defense set, consider downloading Google Chrome or Firefox.

Advanced Sharing Settings

Advanced sharing settings in Windows are accessible at Start > Control Panel > Network & Internet > Network and Sharing Center > Change advanced sharing settings.
Set Public to the following settings:
  • Network discovery – off
  • File and printer sharing – off
  • Public folder sharing – off
  • File sharing connections – Use 128-bit encryption…
  • Password protected sharing – on
Set Home or Work to the following settings:
  • Network discovery – on
  • File and printer sharing – on
  • Public folder sharing – on
  • File sharing connections – Use 128-bit encryption…
  • Password protected sharing – on
  • HomeGroup connections – Allow windows to manage homegroup connections

Configure Automatic Updates

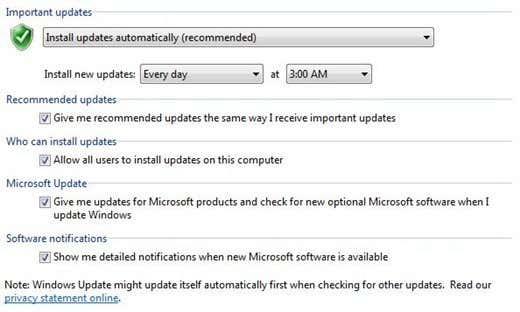
The updates that Microsoft releases for Windows are important for keeping Windows secure. Bug fixes and other security updates are often distributed through Automatic Updates, accessible via Start > Control Panel > System and Security > Windows Update.
Click the Change settings button and consider setting up Automatic Updates with the following settings:
Windows Automatic Updates

Configure Windows Firewall

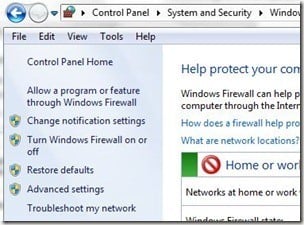
Windows Firewall is accessible via Start > Control Panel > System and Security > Windows Firewall. Make sure that Windows Firewall is on! Additionally, you may want to configure the following settings:
Click the Advanced Settings button.
Firewall Advanced Settings
From the Windows Firewall with Advanced Security window, select Actions > Properties.
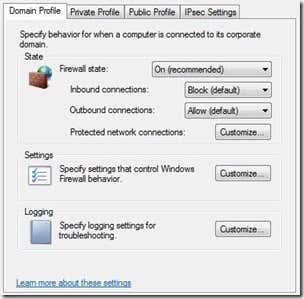
Windows Firewall Settings
Setup the Inbound, Outbound and Protected network connections for Domain Profile, Private Profile and Public Profile to your preference for firewall settings.

Setup User Account Control settings (UAC)

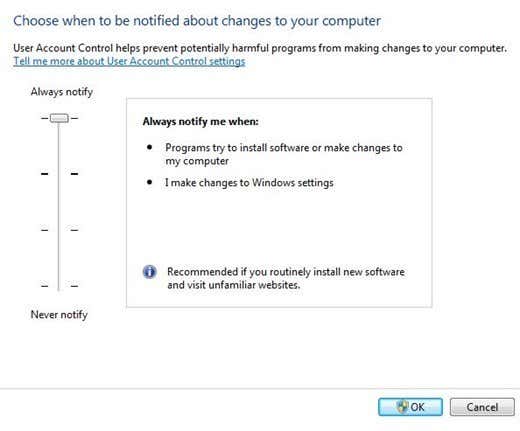
User account controls are accessible via Start > Control Panel > System and Security > Change User Account Control Settings. For maximum security, you may want to setup UAC as so:
Windows UAC
Always notify is the max security setting; however, the Default option might be a better choice for most Windows users. With the Always notify setting on (max security), Windows notifies you even when you make changes to Windows, a bit of overkill.

Setup Flash Player Settings

Most people likely have Adobe Flash player installed so that they can view web content such as YouTube videos. You can adjust specific settings for Adobe Flash Player from Windows using the path Start > Control Panel > System and Security > Flash Player.
For maximum security:
  • Block all sites from storing information on this computer

Windows Security Options

That’s basically all there is to it. By adjusting a few settings within the actual core of the Windows operating system, you can make Windows more secure. Some of these recommended settings may be overkill and unneeded. However, if you want to configure the operating system for maximum defense, this is how you should set it up. Also note, some of these settings can effect other programs, so if set to maximum protection, they may prevent some features of other programs from operating correctly. You may need to adjust these settings accordingly for your particular Windows + apps/programs setup.